HP CloudSystem 8.1
Well, I thought I'd get around to doing a more detailed CloudSystem 8.1 installation Post. I've a homelab luckily with 32GB of Ram. I need to run a few management VMs (Firewall, DC, SQL, vCenter) before I even get started so 32GB sounds like a lot but it's a squeeze, believe me!
Download the zip files from the following site:
The documentation is available here:
Now you should have 4 files (For ESX version):
HP_CloudSystem_Foundation_ESX_8.1_Jul_2014_Z7550-01484.zip
HP_CloudSystem_Enterprise_ESX_8.1_Jul_2014_Z7550-01488.zip
HP_CloudSystem_Tools_8.1_Jul_2014_Z7550-01492.zip
HP_CloudSystem_OO_Studio_8.1_Jul_2014_Z7550-01494.zip
Extract these so they are ready to go. We need to import 4 OVFs via the C# Client into vCenter and edit the memory of the base appliance from 32GB Ram to 8Gb Ram. While importing them change the default name to the ones shown below. I used Thin Provisioning to save space but the screenshot gives you an idea of what the footprint is like:

Note: after editing the Ram on the Base appliance to your satisfaction convert the VMs to Templates. Don't power any up!
The next step is to open a command prompt as administrator and change to the extracted Tools Directory. Extract the file "csstart-windows.zip" and in the command prompt change into this folder.
Run the command "csstart create-config" to generate a sample deployer.conf file. Edit the file deployer.conf and update the line under the heading [Appliance Setup] so it now reads "security-checking = disabled". This is only if you're using self signed vCenter Certificates in a Lab. See Pages 33 & 86 in installation guide for details on the error you'll get otherwise!
Now launch the setup wizard with the following command "csstartgui --start-browser --insecure"
You local browser will be launched and you can now start going through the wizard to setup your environment. Depending on your network setup I recommend disabling any DHCP services to prevent issues later on. If you're using vLANs etc to separate things out you'll be fine.
The Welcome page is as follows:

Click Next

Click Next

Click Next. Fill in the required information:

Click Next. I filled in the desired network configuration. I've a Windows Host file defining the following servers to allow the wizard to work:
192.168.10.70 ca1.lab.local ca1
192.168.10.71 cse1.lab.local cse1
192.168.10.72 ca1.dept.lab.local
192.168.10.73 cse1.dept.lab.local
This ensures the wizard will find what it needs. My Lab Domain Controller is on 192.168.10.10 and the Firewall / Internet Gateway is 192.168.10.200.

Click Next.

I've a fairly flat network so I'm using the same subnet for my Lab, will see how this gets on later!
Enter your vCenter Details Next (ensure you use a resolvable FQDN or you'll have to Dick around with the vCenter self signed certificate error like I did for 1/2 day!)

Now your cluster name, my single physical Host has to be in this cluster for this to work.

Then enter your Port Groups

Now you need to have a load of Port Group ready for this bit. Mine are all attached to the same default vSwitch0 where my 2 Nics are. This is purely for Lab testing purposes.

I Disabled support access as this is a Lab. Hopefully HP won't be involved! On the Next Page I've to click "I Agree" to the CloudSystem Software License Terms. After that you might get a local Firewall warning as csstart does it's thing. It lists all the settings and you've a nice "Install" button. I forgot to make my VMs Templates and the names were wrong, I've updated the screenshot at the top so if you match that you'll be sorted! I also got two errors as follows:
Warning: The Enterprise appliance hostname is not valid. If you are upgrading an Enterprise appliance this must be fixed.
Warning: The Enterprise appliance IP is not valid. If you are upgrading an Enterprise appliance this must be fixed.
There's nothing about this in the release notes, we're installing the Base Appliance and the Enterprise one is done separately later so I'd ignore for now. The Install button is available so what the hell, let's fire it up and see what happens! The CS Base Appliance Template is cloned and you can view the activity in vCenter, in the csstartgui command window or the Web Page Wizard when it updates from time to time.

Now make some coffee.....you can also check out the console of the "ca1" VM if you're bored:

When it finishes it invites you to log in and provides the SSL Certificate for your convenience:
Warning: The Enterprise appliance hostname is not valid. If you are upgrading an Enterprise appliance this must be fixed.
Warning: The Enterprise appliance IP is not valid. If you are upgrading an Enterprise appliance this must be fixed.Warning: The Enterprise appliance hostname is not valid. If you are upgrading an Enterprise appliance this must be fixed.
Warning: The Enterprise appliance IP is not valid. If you are upgrading an Enterprise appliance this must be fixed.
Config file - passed basic tests, moving to advanced tests.
Config file - passed advanced tests.
Creating new base appliance.
Warning: Found 4 cores on the hypvervisor. Decreasing core request from 8 for appliance.
Appliance (ca1) successfully reconfigured
Booting the appliance.
This step could take between 5 and 20 minutes to complete.
The CloudSystem controller is being started.
This step could take between 10 and 20 minutes to complete.
Waiting for the CloudSystem services to finish starting.
This step could take between 5 and 15 minutes to complete.
Configured appliance EULA and support access.
Error: Failed to change HP-OO administrator password within max time allotted. You need to change it manually after logging in to the Admin Console.
Applying the first time setup network selections.
Using ssl cert:
-----BEGIN CERTIFICATE-----
<Edited out>
-----END CERTIFICATE-----
VM started successfully.
Open browser to https://192.168.10.70/
Now you can get started. Note the supported browsers are:

You log in with the credentials you specified earlier for the user "administrator" and you can see in vCenter there's only 1 VM running currently, the Base Appliance. The real work starts from here!
In the Help Section on the Right click Edit Cloud Networking.

Click OK. At this stage I got an error as my vCenter certificate is self-signed. The 8.1 installation guide suggests you can turn off security checking but I've no credentials to edit the base appliance and manually editing the deployer.conf doesn't make a damn bit of difference. See pages 33 & 86 in the installation guide for the error & workaround, good luck to you!
I had to go back and redeploy the appliance several times. Check your DNS server for stale entries also that might hinder deployment. I reuse some IPs over time and the may still be there. 3 Deployments later and I arrived back where I started! It finally worked by changing from using the vCenter IP to the FQDN.
Note: The deployer.conf file contains the password typed in earlier so secure this file once you've finished in a Production environment or change later!
Now the next step is to log in via the url listed, in my case http://192.168.10.70
Next on the right Click "Edit Cloud Networking" and enter the Cloud Management Subnet. I used 10.0.0.0/24

Upon clicking Ok it deployed a number of VMs so now my list looks like the following:

The Network Nodes are clustered and very important to route traffic around so I would look at anti-affinity rules in a Production environment for these. The others could be spread out but it depends if you're going to use the same cluster to run the management components as the tenant VMs or not. I would suggest not to keep things clean and ensure Management has it's own dedicated environment. They recommend 128GB Ram for the HP CloudSystem 8 VM Host so watch out you size the Servers appropriately! 256GB Ram would be necessary I think to accommodate vCenter and other management plugins etc.

Well, that's the Foundation Deployed. I'll skip straight to the Enterprise install next. The GUI takes a bit of getting used to. Persevere and you'll eventually find the menu options you are looking for.
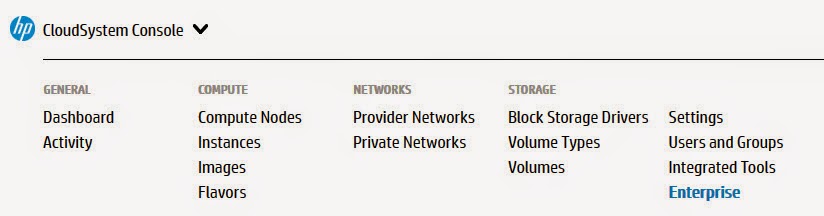
Click the Top Left Menu "CloudSystem Console" and then drift to the far right and Click "Enterprise". Then Click Install CloudSystem Enterprise.

More Menus to fill in (!) so to begin Click Next to get past the welcome screen

Enter in your Cloud Enterprise Details

Now enter the credentials use in the csstart setup wizard earlier and Click Install

At this stage we run into our problem with the HP-OO account password not being set. From the main menu you can click Integrated Tools and launch the logon page under Integrated UIs "HP Operations Orchestration Central" to test you're bogged out! This is new in 8.1 so we need a way to fix the HP-OO password error encountered before we can deploy the Enteprise Appliance. Oh Joy!
Well, that's as far as I can take things today. I'll reach out for a fix to the HP-OO account issue and see what I find. Good luck in setting up your labs and if you see where I've gone wrong let me know!!!
Note: Currently all the VMs combined are using the following memory resources for reference in my Lab:

Error encountered as follows:

Update 15/08/14:
Well, I tried a different password, then tried increasing the Base Appliance Memory from 8GB to 16GB, then 32GB but to no avail! About to give up I had been blocked before from using the cloudadmin account to check the appliance cli itself so this time I managed to get it. You need to use the csadmin.exe from the tools to do this step and once in you can change the hp_oo password and hopefully get onto the next stage!
Fire up admin command prompt and change to directory where csadmin.exe exists and run the command below to set the cloudadmin password:
csadmin console-users set-password --vm-name ca1 --os-username administrator --os-password <type your administrator password here> --os-auth-url https://192.168.10.70/ --insecure --password <type what you want to change your cloudadmin password to here>
Then use VMware Console to access CTRL+ALT+F1 and log in using the cloudadmin account. Then issue the following command:
sudo passwd hp_oo
and set the hp_oo password accordingly.
and set the hp_oo password accordingly.
BUT......this doesn't appear to make any difference, I still can't log into OO !! I'll keep trying but I just need a simple procedure to fix this problem however I've not found anything in csadmin.exe or psql that's helping so far...!