Thursday, 22 October 2015

Installing HP Cloudsystem 9.0 - Part 7

Installing HP Cloudsystem 9.0 - Part 7

This post deals with registering vCenter and activate a compute cluster so you can deploy instances and play with Openstack. 

So, browse to the Operations Console Integrated Tools section

http://192.168.10.80/#/system/integrated_tools

Enter your vCenter details and Click Register

You will see this when completed

Clicking on the entry gives the following information and also allows you to update settings later should a password change etc

Now Click on the Compute Menu section and Compute Nodes. You will see your Clusters there and I'm ready to activate my Compute Cluster which has an Intel NUC in it built for this purpose. I did reset the networking as it was previously attached to my main Distributed vSwitch, I created a second DVS and it is now joined here. See the Admin guide on Page 123 onwards for guidance.

Go to vCenter and Manage each Compute host, go to the Configuration and edit the Security Profile / Firewall / inbound configuration to enable "VM serial port connected over network".

There is also an option of enabling console access from the Openstack console via VNC on ports 5900-6105 but it's a wide range and you probably won't give users access to the Openstack Console?

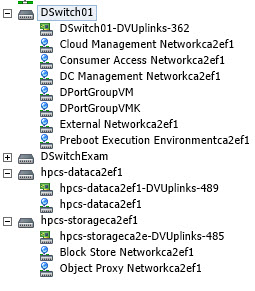
The screenshot above shows how my DVS configuration is looking currently. The Management Host uses DSwitch01 and the Compute Host DSwitch02. Now, I'm really excited about getting VM segmentation without having to use NSX so here is where we exploit the Open vSwitch vApp!

Go to the folder you extracted the CloudSystem 9.0 Tools to and you will see an OVF called "cs-ovsvapp.ova". Upload this to vCenter as follows:

So, when we activate the compute cluster this OVSvApp is automatically installed on each ESXi Host.

Note: I ran into a problem locating the OVSvApp on my Management cluster, it's just a cloning problem but to resolve I rebooted my vCenter to clear the Clone and deleted the Template, reimporting the OVF directly to my Compute Cluster.

Let's see if this is true.

I've selected the Cloud Cluster where my Intel NUC Compute Node is and you get an option to Activate. Double Check your networking and the relevent section in the Admin Guide and off we go!

You can specify vnmic interfaces here and have CS9 create the DVS or as I have do it yourself and tell CS9 where to go. Click Queue for Activation and then you can Click Complete Activiations for when you're doing many at a time I guess.

Boy, they aren't taking any chances! Click Confirm Activations when ready. You will see the Cluster Activating


And you will also see if Cloning your OVSvApp!

After the Clone / relocate issue I encountered I was unable to successfully re-activate the Compute Cluster. I got errors as follows:

Beginning activation checks (Cloud(labvc.lab.local)),
Verifying that no whitespace or special characters exists in the cluster name or its datacenter name while activating cluster Cloud,
Checking if controller(s) are reachable while activating the cluster Cloud,
Verifying cluster has at least one host,
Verifying cluster has at least one shared datastore,
Verifying that the cluster is enabled with DRS,
Checking for instances on the compute Cloud(labvc.lab.local),
Error: OVSvApp installation failed:  (Exception),
Initializing OVSvApp installer configuration,
Running OVSvApp installation scripts

I also got:
Error: OVSvApp installation failed: Couldn't find the OVSvApp Template/Appliance (Exception),

I found one problem - when I dropped my compute host back to a standard vswitch and created a new DVS I forgot to check jumbo frames were enabled so my clone of the OVSvApp or anything else was getting stuck at 29%. Once that was fixed I rebooted vCenter and the Compute Host and tried again with the template attached and stored on the compute host:

Beginning activation checks (Cloud(labvc.lab.local)),
Verifying that no whitespace or special characters exists in the cluster name or its datacenter name while activating cluster Cloud,
Checking if controller(s) are reachable while activating the cluster Cloud,
Verifying cluster has at least one host,
Verifying cluster has at least one shared datastore,
Verifying that the cluster is enabled with DRS,
Checking for instances on the compute Cloud(labvc.lab.local),
Initializing OVSvApp installer configuration,
Running OVSvApp installation scripts,
Found an existing management DVS & DCM portgroup,OVSvApp has been created and configured successfully,Successfully created DVS,
Checking for VCN L2 agent status,
Deployed OVSvApp virtual machines. Status: [u' ovsvapp-compute.lab.local on the host compute.lab.local is up and running '],
Updating Host details for cluster Cloud,
Updating OVSvApp details in vCenter: labvc.lab.local,
Updating cluster details for nova.conf,
Waiting for the service to be detected by the Cloud controller,
Compute node: domain-c261(Cloud) successfully added in the list of hypervisors,
Ending Activation (Cloud(labvc.lab.local))

Phew!! I now have a slightly different network configuration, the OVSvApp has 4 NICs, 3 news ones on DSwitch02 but it also creates a new DVS with no physical uplinks?!

Now the NUC only has 2 x pCPU and the OVSvApp requires the following hardware:
I might try to edit the vCPU and reduce it to 2....Done and it appears to be ok...

The Activated Compute Nodes looks like this now in the Operations Console:

Tenant Networks are created in the Trunk DVS which then allows the OVSvApp to control who they can talk to and how. The 4 OVSvApp nics use the VMXNET3 driver which means no 1Gb E1000 bottlenecks! Lovely! Just check the Load Balancing Policy on these new Port Groups to ensure you're getting the best configuration in your environment.

I also just noticed on page 16-17 in the Troubleshooting guide they recommend removing two port groups when this happens (Failed first attempt at activation):

Manually remove the switches before retrying the compute activation action.
1. Using administrator credentials, log in to vCenter.
2. Select Inventory→Networking.
3. Right-click the Cloud-Data-Trunk-<cluster_name> distributed switch and select Remove.
4. Right-click the CS-OVS-Trunk-<cluster_name> distributed switch and select Remove.
5. Retry the activation action on the ESXi compute node.

That's all for now. I'll cover the command line tools in the next post but after that I'm stuck. I've been having difficulty deploying Windows images from Glance to ESXi. I had similar experiences using Openstack over a year ago but found ways around it. Back to the drawing board butwork is busy so it may be a while due to the labour intensiveness of booting the lab up and shutting it down, it's not a 5 minute quick check. If you find a solution post a comment!!!

Wednesday, 14 October 2015

Installing HP Cloudsystem 9.0 - Part 6

Installing HP Cloudsystem 9.0 - Part 6


So, you need to allow about an hour to start up your Lab according to the Admin Guide instructions starting on page 55.

Management Appliances:

Start by powering on the Compute and Management Hosts and then the OVSVAPP VM on the Compute Host.

Next continue by powering on the ma1 appliance, in my lab it's called cs-mgmt1. If you look at the console it will stay on a screen listing network adapters etc for a few minutes, wait until this clears to a logon screen then SSH on and prep the VM as follows:

sudo -i
service mysql bootstrap-pxc
service mysql status

Power on ma2 / cs-mgmt2
Wait for the logon prompt on the console and check mysql on ma2 from ma1:
ssh cloudadmin@ma2 sudo service mysql status

Power on ma3 / cs-mgmt3
Wait for the logon prompt on the console and check mysql on ma3 from ma1:
ssh cloudadmin@ma3 sudo service mysql status

perform the following on each of the VMs in turn starting with ma1, then ma2, finally ma3:
os-refresh-config
This spins through hundreds of pages of checks, takes 2-3 minutes and ends with this:

Wait until each is completed before doing the next appliance:
os-refresh-config
ssh cloudadmin@ma2 sudo os-refresh-config
ssh cloudadmin@ma3 sudo os-refresh-config

The Healthcheck involves logging into the Management Portal, I use the VIP link as follows:
http://192.168.10.80
Then go to General, Monitoring & Launch Monitoring Dashboard
(I get the odd error "Unable to list alarms - connection aborted, etc....)
This didn't show any useful information at this point
The HA proxy shows all up in green except monasca:
http://192.168.10.80:1993

The Cloud Controllers are next:

Power on cmc or in my case cs-cloud1
Wait a few minutes for it to get to a logon prompt
Go back to the ma1 / cs-mgmt1 appliance and execute the following commands:
ssh cloudadmin@cmc sudo service mysql bootstrap-pxc
ssh cloudadmin@cmc sudo service mysql status

Power on cc1 & cc2 and wait for a logon prompt
(Hit enter as some messages may make it appear to be paused but it's actually ready)
from ma1 run the following commands on the cc1 & cc2 appliances:
ssh cloudadmin@cc1 sudo service mysql status
ssh cloudadmin@cc2 sudo service mysql status

Now perform an os-refresh-config on each appliance:
ssh cloudadmin@cmc sudo os-refresh-config
ssh cloudadmin@cc1 sudo os-refresh-config
ssh cloudadmin@cc2 sudo os-refresh-config
The os-refresh-config completes much faster than it did for the management appliances

Log into the Openstack Console
https://192.168.12.200/admin/info/
User: admin, <password as specified during install>
Check the Admin\System\System Information on the left and inspect each of the sections: Services, Compute Services, Block Storage Services and Network Agents to ensure all are Enabled and operating
The Cloud Controller HA Proxy should also be checked:
http://192.168.10.81:1993

Now for the Enterprise Appliances:

Power on ea1 / cs-enterprise1
Wait for a logon prompt (and yes, it DOES reference a cattleprod!!!)

ssh cloudadmin@ea1
sudo -i
service mysql bootstrap-pxc
service mysql status
sudo -u csauser /usr/local/hp/csa/scripts/elasticsearch start
sudo -u csauser /usr/local/hp/csa/scripts/msvc start
service csa restart
service mpp restart
service HPOOCentral restart
exit
exit

Power on ea2 / cs-enterprise2 & wait for the cattleprod / logon prompt
Power on ea3 / cs-enterprise3 & wait for the cattleprod / logon prompt

ssh cloudadmin@ea2
sudo -i
service mysql status
sudo -u csauser /usr/local/hp/csa/scripts/elasticsearch start
sudo -u csauser /usr/local/hp/csa/scripts/msvc start
service csa restart
service mpp restart
service HPOOCentral restart
exit
exit

ssh cloudadmin@ea3
sudo -i
service mysql status
sudo -u csauser /usr/local/hp/csa/scripts/elasticsearch start
sudo -u csauser /usr/local/hp/csa/scripts/msvc start
service csa restart
service mpp restart
service HPOOCentral restart
exit
exit

At this stage there is no useful information in the Openstack user dashboard or the Operations Console. The HA Proxy appears to be best at this stage:
http://192.168.10.82:1993/

In one scenario my ea2 showed CSA errors above so I ran through the steps above again on that appliance which resolved them and all turned green!

The Co-Stop only blipped to 2/4/6 Milliseconds a few times over this process so I'm happy this is less stressful on the environment!

You can check the Enterprise interfaces such as Marketplace, CSA & OO if you wish here.

Next are the monitoring appliances:

Power on mona1 / cs-monitor1 and wait for the cattleprod / logon screen

Now, I had trouble in one instance shutting down these appliances so on power up I saw a LOT of messages and thought it was shafted. I've since noticed that even after a clean power down it's not happy! You typically notice mona1 cycling through "monasca-notification main process ended messages" a LOT. You may spot a logon prompt on the others hidden around the messages. There is a fix below but run through the mysql steps below first anyway as SSH does work despite the warnings.

On the ma1 appliance connect to mona1:

ssh cloudadmin@mona1
sudo -i
service mysql bootstrap-pxc
service mysql status
exit
exit

Power on mona2 / cs-monitor2 & wait for a logon prompt
Power on mona3 / cs-monitor3 & wait for a logon prompt
ssh cloudadmin@mona2 sudo service mysql status
ssh cloudadmin@mona3 sudo service mysql status


Start the Update Appliance:

Power on ua1 / cs-update1
from the ma1 appliance ssh to it
ssh cloudadmin@ua1 sudo os-refresh-config

That's it - you should be getting health information on the Operations Console & Openstack Console.

Monitor Appliances Fix:

My 3 monitoring appliances are constantly cycling through a pair of errors:

monasca-api main process ended, respawning
monasca-monitoring main process ended, respawning

I've tried power cycling, and bringing up either the first or third one on it's own to no avail. I got pointed by more knowledgeable colleagues to the Admin guide pages 61 & 62 - "Unexpected Shutdown recovery options".

So, even though the console is going Nuts (!) you can still SSH onto these appliances and see what's wrong.

ssh cloudadmin@mona1
sudo -i
cat /mnt/state/var/lib/mysql/grastate.dat
Check the seqno for it's value, mine on all 3 appliances were -1 but I ran the following command on mona1 anyway:
service mysql bootstrap-pxc
service mysql status
then I exited twice and ssh'd into each of the other 2 appliances and ran:
service mysql restart
service mysql status
I then restarted the 3 appliances, one at a time:
ssh cloudadmin@mona1 sudo shutdown -r now
ssh cloudadmin@mona2 sudo shutdown -r now
ssh cloudadmin@mona3 sudo shutdown -r now

So far, no difference, it was the next set of commands that fixed this for me.
ssh cloudadmin@mona1
sudo -s
export PYTHONPATH=/opt/vertica/oss/python/lib/python2.7/site-packages
su dbadmin -c 'python /opt/vertica/bin/admintools -t view_cluster -d mon';
This command firstly showed the following while mona3 was restarting:

 DB  | Host         | State
-----+--------------+--------------
 mon | 192.168.0.33 | INITIALIZING
 mon | 192.168.0.34 | INITIALIZING
 mon | 192.168.0.35 | DOWN

Then it changed to this a few moments later:

 DB  | Host | State
-----+------+-------
 mon | ALL  | DOWN

As all 3 nodes were down we need to restart Vertica from a last good known state. We copy out the vertica_admin_password="XXXXX" from /home/cloudadmin/hosts
vi /home/cloudadmin/hosts
You can just copy everything out of SSH if you're using PUTTY and paste it into Notepad and extract the exact password. Then run the following command:
su dbadmin -c 'python /opt/vertica/bin/admintools -t restart_db -d mon -e last -p
<vertica_admin_password>';
This should do the trick or there is a further command to force the issue:
su dbadmin -c 'python /opt/vertica/bin/admintools -t restart_node -s 192.168.0.33,192.168.0.34,192.168.0.35 -d
mon -p <vertica_admin_password> -F'

Hopefully you can repeat the view_cluster command used earlier to confirm the status as follows:
-----+------+-------
 mon | ALL  | UP

All good!

Monday, 5 October 2015

Installing HP Cloudsystem 9.0 - Part 5

Installing HP Cloudsystem 9.0 - Part 5


The interfaces for CS9, and there are plenty of them are all highly available except for the Update Appliance so your placement and anti-alias rules in a 3 node management cluster is very important.

This is a Lab, so I'm running all mine on a single Host while the Electricity Provider Van drives around the estate trying to figure out who's causing the brownout, I'm running a Cloud Lab buddy! I'm currently drawing 141.76 watts though in case you're interested!

So, to the interfaces:

You get directed to http://192.168.10.50 which is fine except it's not the VIP for the Management Appliance, I've can access the same interface using http://192.168.10.80

Username: Admin (capital "A") and password set earlier, I don't remember your password, that's your job! 
Well, that's different! At least everything is green! The Activity, Logging and Monitoring Dashboards require additional Authentication. If prompted use user "admin"/<password set during install> for these Dashboards. 

There's a Backup & Restore Tab! 

Integrated Tools is where we'll add our vCenter in and activate the Compute Cluster Node. 

So, this is the main Console that equates to the 8.1 HP Horizon Foundation Console. With OO moved to the Enterprise Appliance with CSA, and Openstack residing on it's own Appliances, these Appliances are devoid of Openstack/OO components from what I can tell. Monasca/Kibana URLs point to the Management Appliance so it's involved in exposing the monitoring elements from what I can tell. 

Let's move on to the Openstack Portals:
This is the Classic Openstack Horizon Portal from Juno: 
https://192.168.12.200
(user: admin, password as per install)

And the interface reflects this update:

Now there is still the HP equivalent but it leads to a monitoring page:
http://192.168.10.80:9090
The logon page looks the same as the previous one but we see this after logging in:

Then if you click on the Dashboard button under Monitoring you'll be brought to Monasca which monitors the environment:

The interfaces so far are for Administrator use. We certainly don't want to show them to a customer, that's what CSA is for! A nice friendly Marketplace with the HP OO engine powering the requests sent to Openstack, the Cloud, VMware direct to anywhere you want really! I've heard it can even order Pizza! 

The interface in my Lab is accessed via the following URL:
https://192.168.12.201:8444/csa

Username: Admin
Password: cloud

This will need to be changed later of course....This is CSA 4.5 so there are improvements and changes - you can now search the properties of your subscriptions, I'll test this later. 


The default Consumer Portal is available with nothing published to it:
https://192.168.12.201:8089/org/CSA_CONSUMER

The following credentials are used:
Username: consumer
Password: cloud


Shop away! 

Now the Operations Orchestration Console is accessed here:
http://192.168.10.82:9090/oo


The following credentials are used:
Username: administrator
Password: <password specified during setup>


This is where updated content can be imported from the HP Live Network:
and for CSA:

So that's the tour - I'll activate my Compute Node next and look at deploying a VM to see how that operates. 

Powering down your Lab

Lastly I'll see how to safely power down the Lab as the last thing I want to do is to have to rebuild it from scratch each time! See Page 54 on the HP Helion CloudSystem 9.0 Administrator Guide. 

SSH into ma1, the first Management Appliance created, in my case it's called cs-mgmt1 in vCenter and is on IP 192.168.10.50
We SSH into each appliance in order and shut them down one at a time:

Shutdown the Update Appliance (192.168.10.59):
ssh cloudadmin@ua1 sudo shutdown -h now
(Say yes to trust the ssl fingerprint and enter the password used during setup)

Shutdown the Compute Section of the Cloud:
Shutdown the VMs on the Compute ESXi Host(s) via vCenter
(This includes the OVSvAPP)
Shutdown the Compute ESXi Hosts themselves via vCenter

Shutdown the Monitoring Appliances (192.168.10.33/34/35):
ssh cloudadmin@mona3 sudo shutdown -h now
ssh cloudadmin@mona2 sudo shutdown -h now
ssh cloudadmin@mona1 sudo shutdown -h now
Note: The first one of these worked but the other 2 stalled the first time I did this. Be patient, they take a little longer to shutdown but all 3 worked for me the next time around. 

Shutdown the Enterprise Appliances (192.168.10.56/55/54):
ssh cloudadmin@ea3 sudo shutdown -h now
ssh cloudadmin@ea2 sudo shutdown -h now
ssh cloudadmin@ea1 sudo shutdown -h now

Shutdown the Cloud Controller appliances (192.168.10.53/52/51):
ssh cloudadmin@cc2 sudo shutdown -h now
ssh cloudadmin@cc1 sudo shutdown -h now
ssh cloudadmin@cmc sudo shutdown -h now

Shutdown the Management appliances (192.168.10.58/57/50):
ssh cloudadmin@ma3 sudo shutdown -h now
ssh cloudadmin@ma2 sudo shutdown -h now
ssh cloudadmin@ma1 sudo shutdown -h now

Startup is covered in the same guide on pages 55-57, yes it's That Long!! There's a lot of checking MYSQL status, I mean a LOT! Otherwise it doesn't look too complicated. 


Installing HP Cloudsystem 9.0 - Part 4

Installing HP Cloudsystem 9.0 - Part 4


Next step is to browse to the new Management Appliance via the IP Given, in my case http://192.168.10.50 and you get a First-Time Installer screen. It's a few pages long. I've filled it out as follows:

Edit the Data Center Management Network at this point:
Accept and continue on:

Now comes the biggie - the Password! This little change cost me a week. I know it's in the release notes but in 2015 you would think someone would accept special characters are good for passwords by now. Here is the password restrictions from Cloudsystem 8.1:

The password should have a capital letter and a number. You should have a minimum
of 8 characters, maximum of 40 characters. It must not contain any of the following
characters: less than (<), greater than (>), semicolon (;), comma (,), double-quotation
mark ("), apostrophe ('), ampersand (&), backslash (\), slash (/), vertical bar (|), plus
sign (+), colon (:), equal sign (=), and space.

Now from Cloudsystem 9.0:

Specify a password for admin that is eight characters or less and is a combination of uppercase
and lowercase letters and numerals. Symbols and special characters found on the keyboard
are not supported.

I guess someone forgot to tell the Developer that keyboards come with special characters for a very good reason, grammar and passwords! So, MAKE SURE you choose one that is compliant or you'll get to see 9 wonderful appliances deployed before it bombs out. If you tail the cs-avm-manager.log you'll see your invalid password in plain text appear alongside an error, just for good measure! It will fail, I've seen it, thrice! I used the same password in CS8.1 no problem and most of my other appliances etc in my Lab so this was unexpected and frustrating to say the least. 

If you try to use a small size for Glance you'll get an error:
At this stage I took the precaution of migrating all the cloud template files to my largest datastore as it doesn't ask you about destinations. The new VMs will appear in the same Datastore so during build this means you need a good bit of space (300GB+)!

The settings are summarized as follows:


Click Begin Installation and you can tail the cs-avm-manager.log if you're bored:
tail -f /var/log/cs-avm-manager/cs-avm-manager.log

The following Networks are created so it will end up something like this:

So far, so easy?! It took quite a while to get to the stage where all the appliances fully deployed. You should see the following if you were tailing the logfile above: 


The Initial Setup screen show now show all the deployment progress steps as completed in Green: 

If you get this far you're nearly there. If not here are a few places to look for answers:

Installation has failed. Please review the following log files for errors. Typically any fatal errors are near the end of the log files.

/var/log/cs-avm-manager/cs-avm-manager.log - this shows the overall deployment status.

/var/log/leia/leia-monitor.log - this shows the interaction between the UI and the components that do the deployment.

/var/log/upstart/os-collect-config.log - this shows the preliminary part of the deployment process.

/var/log/pavmms/pavmms_api.log - this shows the lower-level workings of the main part of the deployment process.

Final Steps (Page 25-26, HP Helion CloudSystem 9.0 Installation Guide):

Add a Physical NIC to the new Distributed vSwitches for Object and Block Storage

Wait for the Enterprise Appliances (Yes, all 3!) to finish updating by checking the following log:
cat /var/log/upstart/os-collect-config.log
for the line "CSL Installer Finished Importing additional Capsules"
(This can take another 30 minutes to finish)

SSH to ma1, in my case this is cs-mgmt1, you can check in the vCenter view (DNS Name)
SSH from within this appliance to ea1, which is cs-enterprise1 in my lab
ssh cloudadmin@192.168.10.54  (Yes to accept ECDSA key fingerprint)
sudo -i
vi /usr/local/hp/csa/jboss-as/standalone/deployments/csa.war/WEB-INF/classes/csa.properties
Replace (Nearly at the very bottom of the file): 
OOS_URL=https://192.168.12.201:9090
With:
OOS_URL=http://192.168.0.3:9090   (Make sure you change from https to http!)
service csa restart
exit
exit

Repeat for the other two Enterprise Appliances on 192.168.10.55 & 192.168.10.56

Check the HA Proxy Status page here:
http://192.168.10.82:1993/


We'll go through the various interfaces in the next Part of this series

I've captured the settings I entered on this section of the install process below in text format to help me if I should need to repeat this at a later date:

First-Time Installer Settings used:

Network Settings: Management Trunk

Datacenter Management Network
Primary DNS: 192.168.10.10
IP Ranges: 192.168.10.51-69

Consumer Access Network
vLAN ID: 51
CIDR: 192.168.12.0/24
Default Gateway 192.168.12.254
Appliance IP Ranges: 192.168.12.10-20

Cloud Management Network
vLAN ID: 50

External Network
vLAN ID: 52

Network Settings: Storage Trunk
Block Storage Network
vLAN ID: 60
Object Storage Network
vLAN ID: 61
CIDR: 192.168.19.0/24

Network Settings: Appliance Settings

Management Appliance
DCM FQDN: csmgmt.lab.local
DCM VIP: 192.168.10.80

Cloud Controller
DCM FQDN: cmc.lab.local
DCM VIP: 192.168.10.81
CAN FQDN: cmc.dept.lab.local
CAN VIP: 192.168.12.200

Enterprise Appliance
DCM FQDN: eap.lab.local
DCM VIP: 192.168.10.82
CAN FQDN: eap.dept.lab.local
CAN VIP: 192.168.12.201

Time Settings: 192.168.10.200

Password: Watch out, no special characters, in fact why use a keyboard at all?!! 


Installing HP Cloudsystem 9.0 - Part 3

Installing HP Cloudsystem 9.0 - Part 3


This Post covers the high level steps of how CS 9 is deployed, I've done it more than a few times now before I got it working in my Lab so this post will also cover how I cracked it.

The Steps to deploying CS9 at a high level are as follows:

  • Run the csstartgui.bat to launch an internal web browser
  • Enter in the information required to connect to vCenter and stand up the first Management Appliance
  • Upload the MySQL_Connector_J_JDBC_driver to 6 folders on the Management Appliance and perform permission changes
  • Browse to the new Management Appliance Web Interface and enter in all the configuration information used to build out the rest of CS9
  • Click Begin Installation - there's no turning back now! 
  • Monitor the install by tailing the cs-avm-manager.log file and watching vCenter spin up 12 more appliances (in a typical deployment, there can be more!)
  • Edit each of the 9 initial appliances to knock down their vCPU from 8 to 4
  • Perform a few post install checks and one or two more configuration steps
  • You're done! Add a vCenter, activate the Compute Cluster and deploy your VMs
You should end up with the following:

This comes to just over 92 vCPU, 256GB Ram & a 300GB Disk footprint for all 13 Appliances. Feeling the pain yet?! Memory isn't as much an issue as it settles down after deployment:

Disk Latency went to 3MS a few times and once to 10MS so that's not a problem. 

CPU however was a massive issue for me

This is showing the deployment of the 12 remaining appliances from 1:27pm. CPU pegged at 100% a few times for short intervals but what was more worrying was the CO-STOP value which I've never seen as high! 2355 milliseconds, for a CPU that's death!! BUT....it worked, I got my deployment. Now I'm NOT running 92 vCPU, I'm running 50, and I think I could have shaved that down further. I kept running into deployment failures, mainly caused by using a password with a "!" in it.

Once I figured that out the 9 biggest appliances were stood up but would stall with a failed Deployment message. I was hoping for a way to NOT deploy a HA, (3 of everything) but the best I could come up with was to intercept the appliances as they were being built and change their vCPU configuration back from 8 vCPU to 4 vCPU. And then power them on quickly before anything noticed! My config is as follows:

Appliance
Template Size
Cloned Size My Target Size
Management 1
4 vCPU, 4GB
8 vCPU 16GB 4 vCPU 16GB
Management 2 & 3
4 vCPU, 4GB
8 vCPU 8GB 4 vCPU 8GB
Cloud Controller 4 vCPU, 4GB 8 vCPU 32GB 4 vCPU 32GB
Enterprise 4 vCPU, 4GB 8 vCPU 32GB 4 vCPU 32GB
Update 4 vCPU, 4GB 2 vCPU 8GB 2 vCPU 8GB
Monitor 4 vCPU, 4GB 4 vCPU 8GB 4 vCPU* 8GB
*Could be reduced further?

So, you need to catch each appliance as it's built

The example above is the third Management Appliance, make sure you've gone to the toilet (!) as you'll need to babysit things for 30-45 minutes to capture all the 8 core large Appliances. As soon as you see the Clone power on, power it off using the old C# client connected directly to vCenter and then edit the number of vCPU from 8 down to 4 and Power On the Clone again. 

So, my lab has an E5-2618L v3 CPU which as 8 Cores @ 2.3 GHz with Turbo up to 3.4 GHz. This was pushed pretty hard and a second CPU wouldn't have gone amiss. The 128GB of Ram performed beautifully and I didn't see any pressure there - could have done it with 96GB I think. I've SSD only so Storage wasn't a problem from a performance or space perspective (It's a 1TB Samsung EVO 850 SSD). So if your lab is less than this you're going to have to watch CPU most carefully followed by memory & disk. It may be possible to edit the memory also to reduce that footprint. I certainly think the monitoring appliances could do with less vCPU but I've not tested any further reductions at this point. 
The Graph above shows the memory allocation. The Peaks are each of the 32GB appliances starting up but as you can see it quickly trails off. The most critical CPU actions happen once the 9 appliances are stood up and once the last of the 13 appliances are finished and the final configuration is applied. 

My Lab:
Supermicro MBD-X10DRI-T-O (Dual Socket, 1 populated)
Intel E5-2618L v3 (8 Core x 2.4GHz)
128GB DDR4 Ram
LSI Megaraid 9271-8i
Samsung 1TB 850 EVO SSD
Cisco SG300-10 12 port switch with layer 3 support


Installing HP Cloudsystem 9.0 - Part 2

Installing HP Cloudsystem 9.0 - Part 2


This section deals with the JDBC driver you need to add to the initial Management Appliance ("ma1") to permit the deployment of the Monasca & Enterprise Appliances. Failure to do so will result in the following errors in cs-avm-manager:

If you choose Enterprise:
2015-09-21 11:14:49,267 [MainThread] ERROR    cs_avm_manager.manager Did not find required libmysql-java debian file in /boot/cloudsystem/cs-enterprise

If you deselect Enterprise:
2015-09-21 12:27:40,850 [MainThread] ERROR    cs_avm_manager.manager Did not find required libmysql-java debian file in /boot/cloudsystem/cs-monasca-controller

Now to avoid these extract the contents of the file MySQL_Connector_J_JDBC_driver_Aug_2015_Z7550-96193.zip and copy the file libmysql-java_5.1.32-1_all.deb to the appliance. I used WinSCP to upload the file to /tmp as the intended destination requires permission elevation. Then within Putty (ssh session) I can copy the file to the right path:

sudo -i
cd /boot/cloudsystem/cs-monasca-controller
cp /tmp/libmysql-java_5.1.32-1_all.deb .
chown cloudsystem:cloudsystem libmysql-java_5.1.32-1_all.deb
chmod 644 libmysql-java_5.1.32-1_all.deb
cd /boot/cloudsystem/cs-monasca-controller1/
cp /tmp/libmysql-java_5.1.32-1_all.deb .
chown cloudsystem:cloudsystem libmysql-java_5.1.32-1_all.deb
chmod 644 libmysql-java_5.1.32-1_all.deb
cd /boot/cloudsystem/cs-monasca-controller2/
cp /tmp/libmysql-java_5.1.32-1_all.deb .
chown cloudsystem:cloudsystem libmysql-java_5.1.32-1_all.deb
chmod 644 libmysql-java_5.1.32-1_all.deb

And do this for the Enterprise appliance:

cd /boot/cloudsystem/cs-enterprise
cp /tmp/libmysql-java_5.1.32-1_all.deb .
chown cloudsystem:cloudsystem libmysql-java_5.1.32-1_all.deb
chmod 644 libmysql-java_5.1.32-1_all.deb
cd /boot/cloudsystem/cs-enterprise1
cp /tmp/libmysql-java_5.1.32-1_all.deb .
chown cloudsystem:cloudsystem libmysql-java_5.1.32-1_all.deb
chmod 644 libmysql-java_5.1.32-1_all.deb
cd /boot/cloudsystem/cs-enterprise2
cp /tmp/libmysql-java_5.1.32-1_all.deb .
chown cloudsystem:cloudsystem libmysql-java_5.1.32-1_all.deb
chmod 644 libmysql-java_5.1.32-1_all.deb

Now the driver should be in all 6 folders and you're ready to go to the next step!

To speed this up, after you've entered the first 4 commands (cd/cp/chown/chmod) just up arrow 4 times and edit the destination path by adding a 1 or 2 and then for the next 3 commands up arrow 4 times, enter, repeat until you need to change the number of the folder again. Then just copy / paste the cs-enterprise folder line once, the rest in that section is the same.....

Don't forget this step or you will have to start ALL OVER AGAIN!!

Thursday, 1 October 2015

Installing HP Cloudsystem 9.0 - Part 1

Installing HP Cloudsystem 9.0 - Part 1


Well, here we are, version 9.0 is just out and I've an upgraded the hardware in my Lab system that will (hopefully!) take this on!

The various downloads mean I hope you have good broadband at home or you can leave your laptop in work over the weekend! Once you get hold of them you need to upload the various OVF files until you get something like the following in vCenter:

Ignore my windows images, the ones you want begin with "cs". Keep the template name unchanged, you can see how much space you need via Thin Provisioning (which they recommend as it uploads faster), about 23.87GB in fact!

The basic overview of steps to get CloudSystem 9.0 up and running is as follows:
(From Top to Bottom):


  1. Extract the Tools Zip file, edit the csstartgui.bat and then execute it
  2. Fill out the CS Management Appliance Installer
  3. When the Master Management Appliance is deployed add a MySql file to 6 folders
  4. Fill out the CS 9.0 First-Time Installer
  5. Wait for the additional 12 Appliances to spool up and configure themselves
  6. Perform a few small post install checks and configurations & Activate the Compute Cluster
The whole process will take 1-2 hours for an experienced person on Production Hardware. Allow double that for your first time on Lab Hardware. You should also to have done some planning for the various Networks and other choices. My Posts here should give you a start but you may need to tweak things in your own environment. Again, this is a Lab setup I'm describing so it may help with a POC but consult with a trusted advisor before taking things further. 

Now, deployed with defaults will need 92 vCPU, 256 GB Ram and just over 300GB Disk Space (This is the Thin Provisioned initial Footprint). If your hardware can't cope with that you're not completely out of luck but you'll have a fight on your hands to get it to work. Assuming you have the disk space, I've found memory usage peaks at around 110GB but the max active was 85GB. The biggest issue for me was vCPU. With 6 x 8vCPU VMs running my CO-STOP was crazy high, this indicates vSphere is finding it very hard to get 8 free vCPU at once to schedule an instruction. The more 8 vCPU VMs you put on there the worse it gets!

My Minimum Lab recommendation is as follows:
1 x 8 Core Cpu, More Cores or a second CPU preferably!
96GB Ram, 128GB preferably
350GB Disk, 500GB preferably

My Lab is described in a future Part of this series for comparison. This kind of hardware is not cheap and exceeds what I need for any other solution but to try this at home there is no option to avoid HA and you get 3 of each of the main appliances as a result.

The rest of this post picks up after you've uploaded those templates. Let's kick off the Master Management Appliance installer:

The zip file HP_Helion_CloudSystem_Tools_9.0_Sept_2015_Z7550-96140 contains the file "windows-csstart.zip" in it - extract this to a folder and then extract the contents. Open a command prompt as administrator (just in case) and edit the csstartgui.bat file as follows:
Original:
REM (C) Copyright 2015 HP Development Company, L.P.csstart gui --start-browser
Change to this:
csstart gui --start-browser
Yes, someone used an editor I guess that doesn't tell windows to go to a new line! You can just type in the command also directly into the command prompt after changing to the same directory - csstart is just an EXE after all so no big deal.

You may see a warning:
WARNING: file already exists but should not: C:\Users\DarthV\AppData\Local\Temp\_MEI90642\Include\pyconfig.h
You can ignore this, I saw this on Windows 10 and Windows 8.1 so I'm not worried, it doesn't exist outside of the install so it sounds like a bit of code looping back on itself. 

Now you'll hopefully get your default browser open with a link to "http://localhost:5000/main" and see the following:

So where did I get all this?! Well we need to look at our vCenter configuration and ensure when we click "Install" it doesn't throw everything back in our faces! There firstly is a network design to understand and then you need to configure your Distributed vSwitch on the Management Cluster. So let's pause the install and work on those elements. 

I must note the PDFs are worth a read, I found I could get through them easily and they actually made sense! Kudo's to the Cloud Team for them as I've see other manuals (won't say where) that just dump the help file! They have a whole planning guide but this Blog is a real quick a dirty stand up for a Lab so I'll be taking liberal skips and jumps so watch out! 

Note: the default 8 vCPU for this appliance needs to be avoided. This is covered briefly at the bottom of this post and expanded in a later post from this series. We're aiming for 4 vCPU max on each appliance. 

Now, if you have problems you can track the deploy.log file in the same folder where you launched csstart from. Also you can now use Putty to SSH (This is a vast improvement on 8.1!!!) to the new appliance, just use the following credentials:
username: cloudadmin
password: cloudadmin
sudo -i
cat /var/log/cs-avm-manager/cs-avm-manager.log
cat /var/log/pavmms/pavmms_api.log
Once finished you browse to the new appliance using http and continue the process from there.

Errors encountered:

I found the following error in my Deploy.log when using a Static IP Address:
[2015-09-18 13:31:43,184] DEBUG    csstart.get_keystone_token about to exec command: 'curl' '-k' '--silent' '--show-error' '-X' 'GET' '-H' 'X-Auth-Token: ********' '-H' 'User-Agent: csstart' 'http://ma1.hpiscmgmt.local:6666/rest/pavmms/v1.0/cs-mgmt1'
[2015-09-18 13:31:53,335] DEBUG    csstart.get_keystone_token stdout: <!DOCTYPE HTML PUBLIC "-//W3C//DTD HTML 3.2 Final//EN">
<title>500 Internal Server Error</title>
<h1>Internal Server Error</h1>
<p>The server encountered an internal error and was unable to complete your request.  Either the server is overloaded or there is an error in the application.</p>

I've been told this can be ignored for now.

I also tested using DHCP:
[2015-09-18 13:32:08,454] INFO     start Timed out waiting for appliance upstart to finish.
This may be normal in DHCP environments in which DNS is not configured to auto-register the node. Check the csstart deploy.log file and appliance logs for any errors, then ssh to the management appliance and manually check that upstart has completed successfully.

This also appears normal and can be ignored, I prefer to use a Static address until I understand things a bit better so I've carried on with the settings used in the screenshot above. A Window opens up which tracks the Deploy.log file. See sample output below (you wait for the error mentioned above which means a 10 minute timeout):

Sample Output:

The VM name will be: cs-mgmt1
Config file - passed basic tests, moving to advanced tests.
Trying to connect to Vcenter Server labvc.lab.local ...
Starting new HTTPS connection (1): labvc.lab.local
Connected to Vcenter Server labvc.lab.local
Default load balancing mode is loadbalance_loadbased
DCM network will be configured on DSwitch01 with VLAN 0
Management trunk has been provisioned successfully!
Creating the Management Appliance.
Creating clone req
Appliance (cs-mgmt1) successfully reconfigured
Dryrun is False
Starting new HTTPS connection (1): labvc.lab.local
One or both of cert and key filepaths is None - not sending SSL files.
Starting the appliance.
This step could take between 1 and 3 minutes to complete.
CloudSystem Management Appliance was started successfully.
Waiting for appliance to finish upstart.
This step could take up to 10 minutes to complete.
Timed out waiting for appliance upstart to finish. This may be normal in DHCP environments in which DNS is not configured to auto-register the node. Check the csstart deploy.log file and appliance logs for any errors, then ssh to the management appliance and manually check that upstart has completed successfully.

Continue the CloudSystem 9 setup by browsing to http://192.168.10.50/

The Cloud Management and DC Management Port Groups are created during the install:


The management VM itself has this footprint (=Default - we want to tweak this a bit):
It is using 16.2GB of disk space. but is this all swap? Let's check:

So, the Datastore which contains the Templates is being used to deploy the Clones, fine for 1 appliance but if I deploy the next set I could run out of space. I ended up migrating the templates to my largest Datastore to ensure this wouldn't become an issue later. They are all Thin Provisioned but your Lab could be tight on space. The VM by default gets 8 vCPU and 16GB Ram. One of the later Cloud appliances wants 16 vCPU!! So watch out. I'm trying to fit this onto a small lab system!

Network Design:

So...the network design required to make your Lab work - I used the same networks as before in 8.1 on my cisco switch:

vLAN IDSubnetGatewayPurposeRange used
1192.168.10.0/24192.168.10.254vLAN_Cloud_DC_Mgmt51-69
50192.168.11.0/24N/A (see below)vLAN50_Cloud_Mgmt
51192.168.12.0/24192.168.12.254vLAN51_Cloud_CAN10 to 20
52192.168.1.0/24192.168.1.1vLAN_Cloud_External
55192.168.13.0/24192.168.13.254vLAN4095_Cloud_Data_Trunk
56192.168.14.0/24192.168.14.254vLAN4095_Cloud_Data_Trunk
57192.168.15.0/24192.168.15.254vLAN4095_Cloud_Data_Trunk
58192.168.16.0/24192.168.16.254vLAN4095_Cloud_Data_Trunk
59192.168.17.0/24192.168.17.254vLAN4095_Cloud_Data_Trunk
60192.168.18.0/24N/A iSCSI Block Storage Network
61192.168.19.0/24N/A Object Proxy Network
62192.168.20.0/24N/A PXE Network
63tbctbcVxLAN underlay

There are a few new ones in relation to Block and Object Storage.  All my Lab Hosts, VMs and Management IPs are on 192.168.10.x so I'm deploying the initial management appliance there first and upon creating the appliance the install deploys the Cloud Management and Cloud CAN port groups without vLAN IDs into my Distributed vSwitch where the vmkernel resides. Note my management vLAN 50 is isolated and can't route as it has no gateway, this solved an issue with 8.1 so I'm keeping it the same here. There is a section in the install guide to be used when deploying the Management Appliances onto the same Hosts when vCenter resides, I've not gone down that road and not experienced any issues but take note if you're building a real Lab to do more than play around. You may encounter issues. 

The biggest changes I had to make to my Lab configuration were:
  • Placed my Management Host into a Cluster - it's the only member but keeps CS9.0 happy!
  • Enable HA and DRS but disable HA admission control
  • Migrated my management host vmkernel management port into the DVS (which I hate doing but CS9.0 won't install if it see's you hiding your vmkernel in a standard switch for simplicity). 
That's it for now. If you need to restart the process, power down the management appliance and delete it, also delete the two new port groups shown above, then close your browser and cancel the script running in the command prompt. The deploy.log will be appended to, not overwritten and you can do this as many times as you like before beginning the next step. There no option to create a lab sized deployment so you'll need 3 of every appliance which will stretch everything in terms in
resources.....!

Finally to keep the Appliance size under control, as soon as the appliance is deployed and finished configuring itself in vCenter, it will be powered on. Power it off immediately, edit the # vCPU from 8 to 4 and Power it back on. We'll repeat this procedure later but it keeps the footprint down. This is not supported by HP and obviously won't allow the solution to scale as the design intended. However for a Lab, unless you're super rich or have a Company Lab available, is the only way to get this to deploy correctly that I've found so far. Ideally I'd like a non HA option with 4 appliances total or a config file to edit the virtual hardware so you don't have to intercept the build in vCenter!

Before I forget, and I'll repeat this later, watch out for the Password used in the next deploy step (The First-Time Installer). Make sure it meets the following requirements (Taken from Release Notes):

Specify a password for admin that is eight characters or less and is a combination of uppercase
and lowercase letters and numerals. Symbols and special characters found on the keyboard
are not supported.

I'll cover it in a later post but this set me back two days until I figured it out.....I used a "!" in CS 8.1 without an issue, it kicked my ass here....

Update: Note, if you intend to use Signed CA Certificates, deploy them NOW, during install. It's much tricker to do this afterwards so take the time to get this right up front.