Installing HP Cloudsystem 9.0 - Part 4
Next step is to browse to the new Management Appliance via the IP Given, in my case http://192.168.10.50 and you get a First-Time Installer screen. It's a few pages long. I've filled it out as follows:


Edit the Data Center Management Network at this point:

Accept and continue on:


Now comes the biggie - the Password! This little change cost me a week. I know it's in the release notes but in 2015 you would think someone would accept special characters are good for passwords by now. Here is the password restrictions from Cloudsystem 8.1:
The password should have a capital letter and a number. You should have a minimum
of 8 characters, maximum of 40 characters. It must not contain any of the following
characters: less than (<), greater than (>), semicolon (;), comma (,), double-quotation
mark ("), apostrophe ('), ampersand (&), backslash (\), slash (/), vertical bar (|), plus
sign (+), colon (:), equal sign (=), and space.
Now from Cloudsystem 9.0:
Specify a password for admin that is eight characters or less and is a combination of uppercase
and lowercase letters and numerals. Symbols and special characters found on the keyboard
are not supported.
I guess someone forgot to tell the Developer that keyboards come with special characters for a very good reason, grammar and passwords! So, MAKE SURE you choose one that is compliant or you'll get to see 9 wonderful appliances deployed before it bombs out. If you tail the cs-avm-manager.log you'll see your invalid password in plain text appear alongside an error, just for good measure! It will fail, I've seen it, thrice! I used the same password in CS8.1 no problem and most of my other appliances etc in my Lab so this was unexpected and frustrating to say the least.

If you try to use a small size for Glance you'll get an error:

At this stage I took the precaution of migrating all the cloud template files to my largest datastore as it doesn't ask you about destinations. The new VMs will appear in the same Datastore so during build this means you need a good bit of space (300GB+)!
The settings are summarized as follows:


Click Begin Installation and you can tail the cs-avm-manager.log if you're bored:
tail -f /var/log/cs-avm-manager/cs-avm-manager.log
The following Networks are created so it will end up something like this:
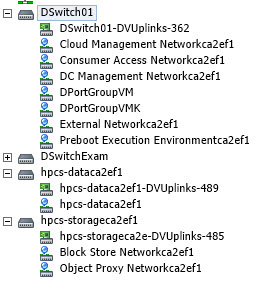
So far, so easy?! It took quite a while to get to the stage where all the appliances fully deployed. You should see the following if you were tailing the logfile above:

The Initial Setup screen show now show all the deployment progress steps as completed in Green:

If you get this far you're nearly there. If not here are a few places to look for answers:
Installation has failed. Please review the following log files for errors. Typically any fatal errors are near the end of the log files.
/var/log/cs-avm-manager/cs-avm-manager.log - this shows the overall deployment status.
/var/log/leia/leia-monitor.log - this shows the interaction between the UI and the components that do the deployment.
/var/log/upstart/os-collect-config.log - this shows the preliminary part of the deployment process.
/var/log/pavmms/pavmms_api.log - this shows the lower-level workings of the main part of the deployment process.
Final Steps (Page 25-26, HP Helion CloudSystem 9.0 Installation Guide):
Add a Physical NIC to the new Distributed vSwitches for Object and Block Storage
Wait for the Enterprise Appliances (Yes, all 3!) to finish updating by checking the following log:
cat /var/log/upstart/os-collect-config.log
for the line "CSL Installer Finished Importing additional Capsules"
(This can take another 30 minutes to finish)
SSH to ma1, in my case this is cs-mgmt1, you can check in the vCenter view (DNS Name)
SSH from within this appliance to ea1, which is cs-enterprise1 in my lab
ssh cloudadmin@192.168.10.54 (Yes to accept ECDSA key fingerprint)
sudo -i
vi /usr/local/hp/csa/jboss-as/standalone/deployments/csa.war/WEB-INF/classes/csa.properties
Replace (Nearly at the very bottom of the file):
OOS_URL=https://192.168.12.201:9090
With:
OOS_URL=http://192.168.0.3:9090 (Make sure you change from https to http!)
service csa restart
exit
exit
Repeat for the other two Enterprise Appliances on 192.168.10.55 & 192.168.10.56
Check the HA Proxy Status page here:
http://192.168.10.82:1993/

We'll go through the various interfaces in the next Part of this series
I've captured the settings I entered on this section of the install process below in text format to help me if I should need to repeat this at a later date:
First-Time Installer Settings used:
Network Settings: Management Trunk
Datacenter Management Network
Primary DNS: 192.168.10.10
IP Ranges: 192.168.10.51-69
Consumer Access Network
vLAN ID: 51
CIDR: 192.168.12.0/24
Default Gateway 192.168.12.254
Appliance IP Ranges: 192.168.12.10-20
Cloud Management Network
vLAN ID: 50
External Network
vLAN ID: 52
Network Settings: Storage Trunk
Block Storage Network
vLAN ID: 60
Object Storage Network
vLAN ID: 61
CIDR: 192.168.19.0/24
Network Settings: Appliance Settings
Management Appliance
DCM FQDN: csmgmt.lab.local
DCM VIP: 192.168.10.80
Cloud Controller
DCM FQDN: cmc.lab.local
DCM VIP: 192.168.10.81
CAN FQDN: cmc.dept.lab.local
CAN VIP: 192.168.12.200
Enterprise Appliance
DCM FQDN: eap.lab.local
DCM VIP: 192.168.10.82
CAN FQDN: eap.dept.lab.local
CAN VIP: 192.168.12.201
Time Settings: 192.168.10.200
Password: Watch out, no special characters, in fact why use a keyboard at all?!!