Thursday, 15 February 2018

TPDSrm.exe


TPDSrm.exe


This post is about an issue I faced recently when integrating VMware Site Recovery Manager on a customer site. As part of the integration you need to get both SRM servers to trust the 3PAR certificate. There is a command to do this but for some reason it was not working for me. Someone else out there may have this issue so hopefully this will save you an hour or two troubleshooting!

The command syntax is as follows:


TPDSrm.exe validatecert –sys <ip address of 3PAR> –user username –pass password

So the symptoms were as follows:

If you just type in TPDSrm.exe and press enter you get the help page. It shows you the various options. I then crafted the full command and entered it but it came back with the help page again! I checked for typos, there were none. I tried the other SRM server and got the same result. I then upgraded the SRA software from 6.5 to 6.5.3 and it was no better! 

I was really scratching my head at this stage. The only way I could get a different reaction was to put <> around some of the values, just to prove it was reading the command, this gave an error of course. Other commands to showcache or listcerts works fine! There was nothing to show but at least it ran the command!

I then tried substituting crap into the value fields as follows:

TPDSrm.exe validatecert –sys george –user bob –pass bob

This got me nowhere, it was as if it didn't matter what the commands I tried there was something else going on here. I was about ready to call it a day and log a support call when I tried typing out the commands one at a time like this:

TPDSrm.exe 

TPDSrm.exe validatecert 

TPDSrm.exe validatecert –sys george 

TPDSrm.exe validatecert –sys george –user bob 

TPDSrm.exe validatecert –sys george –user bob –pass bob

When I typed in the final command it actually did something and came back to say it couldn't find the system. I then went back and typed in my original command and got the help screen again! Then I typed out the command is 5 stages as listed above, but with valid data (although with a fake password as I wanted to rule out a "!" as causing a problem. It tried to connect and failed. I then used the correct password after updating it to remove a "!" just in case and it connected fine. The cert was trusted and I could repeat this process on the other server. 

Conclusion - either a "!" in the password or a copy / paste issue is the only conclusion I could reach. I don't think it was the password but perhaps the notepad file I used to stage the command, copied over RDP, corrupted the command in some way? I did try typing the whole command and this failed too but after so many attempts maybe I didn't try this. 

Anyway, strange one, might get someone out of a hole in the future. 

Tuesday, 13 February 2018

Terraform - Azure

Terraform - Azure


This post follows on from the previous ones and demonstrates using Terraform to create an Azure IaaS VM, just for kicks!

Install Azure CLI 2.0 and from a command prompt or powershell type "az" and press enter. You should now see Azure commands available for your enjoyment!
https://docs.microsoft.com/en-us/cli/azure/install-azure-cli-windows?view=azure-cli-latest

Now to login you type "az login" and follow the instruction to authenticate. You copy the URL and enter the given code to authenticate the CLI.

Next, set your subscription ID as follows:
az account set --subscription="<SUBSCRIPTION_ID>"

If you have access to multiple subscriptions this is where you spend a bit of time checking you're targeting the right one! Or don't do this on a Friday....!

Next query the following IDs:
az account show --query "{subscriptionId:id, tenantId:tenantId}"
Copy these to Notepad for later.

Next create Terraform credentials for it to use:
az ad sp create-for-rbac --role="Contributor" --scopes="/subscriptions/<SUBSCRIPTION_ID from above>"

This gives you the appId and password you'll need.....copy these out to notepad also to make the next step easier. Let's say this is the output from the previous step:

  "appId": "7654321",
  "displayName": "azure-cli-2018-02-09-09-23-18",
  "name": "http://azure-cli-2018-02-09-09-23-18",
  "password": "abcdefg",
  "tenant": "1234567"

This is the command you need to edit:
az login --service-principal -u SP_NAME -p PASSWORD --tenant TENANT

So, open a new powershell or command prompt and in this case we would enter:
az login --service-principal -u "http://azure-cli-2018-02-09-09-23-18" -p "abcdefg" --tenant "1234567"
I've replaced by GUIDs here to show which field maps into the command. This should authenticate you within a second or two and then you can test with a simple query as follows:

az account list-locations
or
az vm list-sizes --location northeurope

Now setup a blank folder and the terraform.exe in it and copy the following file as terraform_azure.tf into it. Replace the Azure Provider section AND ssh key with your own values (Highlighted).

terraform_azure.tf

variable "resourcename" {
  default = "myResourceGroup"
}

# Configure the Microsoft Azure Provider
provider "azurerm" {
    subscription_id = "XXXXXXXX"
    client_id       = "XXXXXXXX"
    client_secret   = "XXXXXXXX"
    tenant_id       = "XXXXXXXX"
}

# Create a resource group if it doesn’t exist
resource "azurerm_resource_group" "myterraformgroup" {
    name     = "myResourceGroup"
    location = "northeurope"

    tags {
        environment = "Terraform Demo"
    }
}

# Create virtual network
resource "azurerm_virtual_network" "myterraformnetwork" {
    name                = "myVnet"
    address_space       = ["10.0.0.0/16"]
    location            = "northeurope"
    resource_group_name = "${azurerm_resource_group.myterraformgroup.name}"

    tags {
        environment = "Terraform Demo"
    }
}

# Create subnet
resource "azurerm_subnet" "myterraformsubnet" {
    name                 = "mySubnet"
    resource_group_name  = "${azurerm_resource_group.myterraformgroup.name}"
    virtual_network_name = "${azurerm_virtual_network.myterraformnetwork.name}"
    address_prefix       = "10.0.1.0/24"
}

# Create public IPs
resource "azurerm_public_ip" "myterraformpublicip" {
    name                         = "myPublicIP"
    location                     = "northeurope"
    resource_group_name          = "${azurerm_resource_group.myterraformgroup.name}"
    public_ip_address_allocation = "dynamic"

    tags {
        environment = "Terraform Demo"
    }
}

# Create Network Security Group and rule
resource "azurerm_network_security_group" "myterraformnsg" {
    name                = "myNetworkSecurityGroup"
    location            = "northeurope"
    resource_group_name = "${azurerm_resource_group.myterraformgroup.name}"

    security_rule {
        name                       = "SSH"
        priority                   = 1001
        direction                  = "Inbound"
        access                     = "Allow"
        protocol                   = "Tcp"
        source_port_range          = "*"
        destination_port_range     = "22"
        source_address_prefix      = "*"
        destination_address_prefix = "*"
    }

    tags {
        environment = "Terraform Demo"
    }
}

# Create network interface
resource "azurerm_network_interface" "myterraformnic" {
    name                      = "myNIC"
    location                  = "northeurope"
    resource_group_name       = "${azurerm_resource_group.myterraformgroup.name}"
    network_security_group_id = "${azurerm_network_security_group.myterraformnsg.id}"

    ip_configuration {
        name                          = "myNicConfiguration"
        subnet_id                     = "${azurerm_subnet.myterraformsubnet.id}"
        private_ip_address_allocation = "dynamic"
        public_ip_address_id          = "${azurerm_public_ip.myterraformpublicip.id}"
    }

    tags {
        environment = "Terraform Demo"
    }
}

# Generate random text for a unique storage account name
resource "random_id" "randomId" {
    keepers = {
        # Generate a new ID only when a new resource group is defined
        resource_group = "${azurerm_resource_group.myterraformgroup.name}"
    }

    byte_length = 8
}

# Create storage account for boot diagnostics
resource "azurerm_storage_account" "mystorageaccount" {
    name                        = "diag${random_id.randomId.hex}"
    resource_group_name         = "${azurerm_resource_group.myterraformgroup.name}"
    location                    = "northeurope"
    account_tier                = "Standard"
    account_replication_type    = "LRS"

    tags {
        environment = "Terraform Demo"
    }
}

# Create virtual machine
resource "azurerm_virtual_machine" "myterraformvm" {
    name                  = "myVM"
    location              = "northeurope"
    resource_group_name   = "${azurerm_resource_group.myterraformgroup.name}"
    network_interface_ids = ["${azurerm_network_interface.myterraformnic.id}"]
    vm_size               = "Standard_DS1_v2"

    storage_os_disk {
        name              = "myOsDisk"
        caching           = "ReadWrite"
        create_option     = "FromImage"
        managed_disk_type = "Premium_LRS"
    }

    storage_image_reference {
        publisher = "Canonical"
        offer     = "UbuntuServer"
        sku       = "16.04.0-LTS"
        version   = "latest"
    }

    os_profile {
        computer_name  = "myvm"
        admin_username = "azureuser"
    }

    os_profile_linux_config {
        disable_password_authentication = true
        ssh_keys {
            path     = "/home/azureuser/.ssh/authorized_keys"
            key_data = "ssh-rsa AAAAB3Nz{snip}hwhqT9h"
        }
    }

    boot_diagnostics {
        enabled = "true"
        storage_uri = "${azurerm_storage_account.mystorageaccount.primary_blob_endpoint}"
    }

    tags {
        environment = "Terraform Demo"
    }
}


The values you need to replace are a little confusing at first, here is a mapping:

ARM_SUBSCRIPTION_ID=your_subscription_id
ARM_CLIENT_ID=your_appId
ARM_CLIENT_SECRET=your_password
ARM_TENANT_ID=your_tenant_id

I copied the previous CLI output to Notepad and stitched together what I was after. The CLIENT_ID in particular confused me at first.

  "subscriptionId": "1020304050",
  "tenantId": "1234567"

  "appId": "7654321",
  "displayName": "azure-cli-2018-02-09-09-23-18",
  "name": "http://azure-cli-2018-02-09-09-23-18",
  "password": "abcdefg",
  "tenant": "1234567"

So from the above this is what we should have after you put in your values:

    subscription_id = "1020304050"
    client_id       = "7654321"
    client_secret   = "abcdefg"
    tenant_id       = "1234567"

You have everything you need, just take your time piecing it together. Then you can use this again and again later. If you've access to multiple subscriptions, be careful here!!

One last thing - the"ssh-rsa" line needs to be updated with a valid key or you'll get an error. To do this download puttygen.exe and click generate with the default RSA parameter option. You can copy out the entire key field and paste it as follows between the quotes. So from this:

key_data = "ssh-rsa AAAAB3Nz{snip}hwhqT9h"

to

key_data = "ssh-rsa AAAAB3NzaC1yc2EAAAAB<snip>y/uvk+dBZ2REP4Uatw== rsa-key-20180209"

It's a LOT longer than that, trust me! Now enter a pass phrase and save the private key to test the new vm shortly.

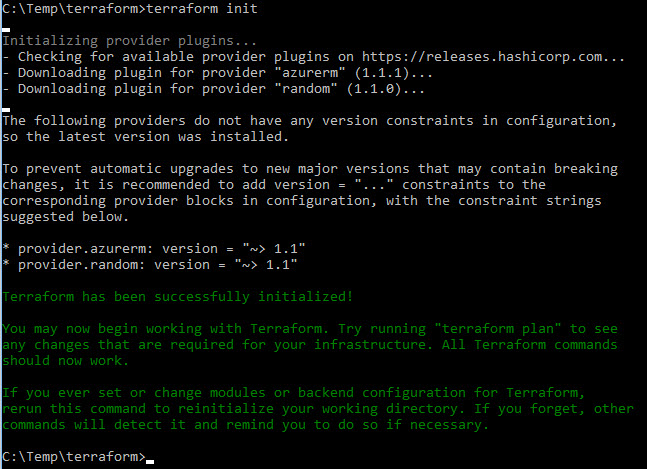
Run "terraform init"

Next run "terraform plan"
 Truncated here out of boredom.....
Ok, now we're ready to apply this and see what happens. This script is taken from here:
https://docs.microsoft.com/en-us/azure/virtual-machines/linux/terraform-create-complete-vm
https://docs.microsoft.com/en-us/azure/virtual-machines/linux/terraform-create-complete-vm#complete-terraform-script

We run "terraform apply"

Truncated here for boredom.....

Once finished use this to get the public IP:
az vm show --resource-group myResourceGroup --name myVM -d --query [publicIps] --o tsv

Then test by connecting with putty/ssh and that private key you used earlier!
All built and connected. Use "azureuser" as the username, you just need enter that passphrase and you should connect as shown.

Here is the Azure Portal View:
 This is all the Resources just created with this script:


Finally we can destroy everything:
Ttruncated out of boredom.......
So, where are those resources? All Gone:
There you have it!

So in this example we used the Microsoft documentation to generate an Azure VM and all it's associated objects and resources via Terraform, and connect to it.

The official Terraform Azure Provider documentation is here but I didn't need to use it in the end:
https://www.terraform.io/docs/providers/azure/index.html

Like before you can craft the file we used here into multiple files to capture variables and data separately. If you want to have more fun try this with Amazon but that's where I'm going to hold it for now. I've some VVOLs to play with next.....!!

Friday, 9 February 2018

Terraform - Level 2

Terraform - Level 2


So here I'll continue on from my previous post and show how you "arrange" terraform files in a better way. Some elements of the previous build.tf file will never change or rarely. The connection information might update it's password but the rest is fairly static. You may wish to change which Datacenter, Cluster, Datastore and Network is used for each set of VMs but the definitions themselves that you want to work with can remain fairly constant. You might decide tags are important and add that to your definitions so that everyone now has to include tag data in their build.tf file.

By the way I first came across Terraform recently from a vBrownbag session by Colin Westwater:
http://www.vgemba.net
https://www.youtube.com/watch?v=nQ7oRSi6mBU
Great work by him on this!

I'd also recommend the following book as a general guide to this whole area:
Infrastructure as Code : Managing Server in the Cloud - Kief Morris
https://www.amazon.co.uk/Infrastructure-Code-Managing-Servers-Cloud-ebook/dp/B01GUG9ZNU

You can check the Terraform version as follows:
They have added a lot of improvements recently but note that your code may give errors from time to time after providers are updated. Then it's back to the documentation to see what's happened!

There are three broad files you should use to start with:

build.tf - tells terraform what to build (what we used in the last post)
variables.tf - define the variables, static, rarely changes
terraform.tfvars - defines the values for the variables, usernames, password, vcenter address etc

So I'd expect there to be a range of build.tf files (each with different names of course) that were written to perform a set of tasks. Developers can handle that. A Senior Developer might be assigned to maintain the variables and values for them so these are controlled and kept sane!

Note: if using Github you should exclude the terraform.tfvars from being updated or you'll leak your environment credentials!

The full range of create / clone VM options is covered in the documentation here:
https://www.terraform.io/docs/providers/vsphere/r/virtual_machine.html

So, let's create a fresh folder, put the Terraform.exe in it and start over. The three files we'll need to create are listed below with their contents to start you off, then we'll do the same commands "terraform init / plan / apply / destroy" as before and see what happens.

terraform.tfvars

# Top level variables that define the connection to the environment
vsphere_vcenter = "192.168.10.17"
vsphere_user = "administrator@vsphere.local"
vsphere_password = "Get Your Own Password"
vsphere_datacenter = "Labdc"

variables.tf

# Variables
variable "vsphere_vcenter" {}
variable "vsphere_user" {}
variable "vsphere_password" {}
variable "vsphere_datacenter" {}

build.tf

# Configure the VMware vSphere Provider
provider "vsphere" {
    vsphere_server = "${var.vsphere_vcenter}"
    user = "${var.vsphere_user}"
    password = "${var.vsphere_password}"
    allow_unverified_ssl = true
}

data "vsphere_datacenter" "dc" {
  name = "Labdc"
}

data "vsphere_datastore" "datastore" {
  name          = "Datastore0"
  datacenter_id = "${data.vsphere_datacenter.dc.id}"
}

data "vsphere_resource_pool" "pool" {
  name          = "Labcl/Resources"
  datacenter_id = "${data.vsphere_datacenter.dc.id}"
}

data "vsphere_network" "network" {
  name          = "VM Network"
  datacenter_id = "${data.vsphere_datacenter.dc.id}"
}

data "vsphere_virtual_machine" "template" {
  name          = "CentOS"
  datacenter_id = "${data.vsphere_datacenter.dc.id}"
}

resource "vsphere_virtual_machine" "vm" {
  name             = "terraform-test"
  resource_pool_id = "${data.vsphere_resource_pool.pool.id}"
  datastore_id     = "${data.vsphere_datastore.datastore.id}"

  num_cpus = 2
  memory   = 1024
  guest_id = "${data.vsphere_virtual_machine.template.guest_id}"

  scsi_type = "${data.vsphere_virtual_machine.template.scsi_type}"

  network_interface {
    network_id   = "${data.vsphere_network.network.id}"
    adapter_type = "${data.vsphere_virtual_machine.template.network_interface_types[0]}"
  }

  disk {
    label            = "disk0"
    size             = "${data.vsphere_virtual_machine.template.disks.0.size}"
    eagerly_scrub    = "${data.vsphere_virtual_machine.template.disks.0.eagerly_scrub}"
    thin_provisioned = "${data.vsphere_virtual_machine.template.disks.0.thin_provisioned}"
  }

  clone {
    template_uuid = "${data.vsphere_virtual_machine.template.id}"

    customize {
      linux_options {
        host_name = "terraform-test"
        domain    = "lab.local"
      }

      network_interface { }

    }
  }
}


Now I don't see people firing up Terraform for one off builds. I see this tool being used as part of an automated strategy where servers are built, updated, destroyed and rebuilt automatically. Someone updates the Template once per week perhaps and someone else may adjust the virtual hardware settings in the build.tf file and next time the automated script runs the environment takes on the new values. This also doesn't address auto-scaling, another level entirely. Your inventory and monitoring solutions should handle these changes with ease.
Of course not all applications will accept this approach and it has to be seamless. But this is a journey so read the book above and see how this approach could be of benefit to you in your particular environment to help stabilise a more agile approach to IT.

In a later post I'll show you Azure in action as that will help coalesce how this tool is more powerful than one which just speaks to a single environment. 

Tuesday, 6 February 2018

Terraform - The Basics

Terraform - The Basics


This post is about using Terraform to build up and tear down VMware VMs. I've used PowerCLI for various operations in the past but Terraform is broader in that you can use it with Amazon, Azure i.e. more than just VMware. The full list is here:

https://www.terraform.io/docs/providers/index.html

Now, I doubt the options will go as deep as PowerCLI but having a common tool you can use across all these platforms allows a team to develop a standardised approach and limit the use of different tools for different platforms for common tasks.

This article focuses on VMware as it gives you a chance to test this in a lab environment. You can use Terraform to work with more than VMs too - port groups, datastores, tags, snapshots etc!

So, let's get started and download the latest version of Terraform from the link below:

https://www.terraform.io/downloads.html

I've grabbed the 64-bit Windows edition and extracted the contents to a folder on my PC. All the zip contains is a single EXE file! How's that for light?! You can put this file in your PATH so you can invoke it form anywhere or just open a command prompt and change into that directory and you're ready to go. I'd recommend Notepad ++ or similar as we'll be working with a few text files that feed Terraform the neccessary instructions about what you want it to do.


Ok, you see that build.tf file - this is a very basic intro as normally you split things out differently but to get started this will work fine. Create a new text file called "build.tf" in the same folder as Terraform to contain the following:

provider "vsphere" {
  user           = "${var.vsphere_user}"
  password       = "${var.vsphere_password}"
  vsphere_server = "${var.vsphere_server}"

  # if you have a self-signed cert
  allow_unverified_ssl = true
}

variable "vsphere_user" {
  default = "administrator@vsphere.local"
}

variable "vsphere_password" {
  default = "YOUR PASSWORD HERE"
}

variable "vsphere_server" {
  default = "labvc.lab.local"
}

data "vsphere_datacenter" "dc" {
  name = "Labdc"
}

data "vsphere_datastore" "datastore" {
  name          = "Datastore0"
  datacenter_id = "${data.vsphere_datacenter.dc.id}"
}

data "vsphere_resource_pool" "pool" {
  name          = "Labcl/Resources"
  datacenter_id = "${data.vsphere_datacenter.dc.id}"
}

data "vsphere_network" "network" {
  name          = "VM Network"
  datacenter_id = "${data.vsphere_datacenter.dc.id}"
}

resource "vsphere_virtual_machine" "vm" {
  name             = "terraform-test"
  resource_pool_id = "${data.vsphere_resource_pool.pool.id}"
  datastore_id     = "${data.vsphere_datastore.datastore.id}"

  num_cpus = 2
  memory   = 1024
  guest_id = "other3xLinux64Guest"
  wait_for_guest_net_timeout = 0
  network_interface {
    network_id = "${data.vsphere_network.network.id}"
  }

  disk {
    label = "disk0"
    size  = 20
  }
}

You'll need to edit the script to match your environment, there are 3 variables:

  • vsphere_user (use a UPN for this - e.g. user@domain.com)
  • vsphere_password
  • vsphere_server

and 4 data fields:

  • vsphere_datacenter
  • vsphere_datastore
  • vsphere_resource_pool
  • vsphere_network

Update these 7 fields above, otherwise you'll get errors. Yes, you can use Datastore clusters and get all fancy but for now we're picking a single VM on a fixed environment!

Now you're ready to initialise Terraform and create your first VM. Run the command "Terraform init" and it will download the vSphere provider for you - internet access is a requirement here:


Now run the command "Terraform plan" and you will see the following:
 Truncated here to save space........
It shows it's going to add 1 VM. Now we're ready to apply the change:

Enter the command "Terraform apply" and enter "yes" to the prompt:
  Truncated here to save space........
  Truncated here to save space........

This is just to demonstrate an API call to create a VM with Terraform works and it only took you what, 10 minutes to set up?!!

If we check VMware we'll see the following:
 The VM has been created and powered on.

The code used here is taken from the example usage in this URL:
https://www.terraform.io/docs/providers/vsphere/index.html

If you try to run it raw you'll get hit with missing variables - these are the user/password/vcenter variable fields I've added into my code above.

Now we're ready to tear back down the VM we've created. If you have a quick look at the Terraform folder you'll see it has a new file and folder in it:
The terraform.tfstate file you can open to see it's tracking what we've just built. We just need to execute the following command "Terraform destroy", it shows this will destro 1 VM, Enter "yes" to confirm:
 This trigger the following tasks in vCenter:
If you reload terraform.tfstate you'll see the data has shrunk and the VM it previously recorded has been removed which reflects the current state.

So what's the big deal with creating a single VM with a script? Well, it's repeatable, you can create 100's of VMs this way, over and over again, build them up and tear them down. If your Devs update a template daily, this allows them to update a platform overnight to run the new code. This necessitates the use of VMs as essentially stateless however so config files and databases are held off those VMs.

Have a look at the following book for a good read about DevOps that is presented as story of a company trying to move to DevOps but meeting resistance along the way:
The Phoenix Project
https://www.amazon.co.uk/Phoenix-Project-DevOps-Helping-Business-ebook/dp/B00AZRBLHO
This is an older book based around a manufacturing plant faced with imminent closure in 3 months unless they improve their productivity:
The Goal
https://www.amazon.co.uk/Goal-Process-Ongoing-Improvement-ebook/dp/B002LHRM2O
Both are easily the best business reads I've enjoyed in recent years, well worth checking out!

We'll leave it there. In my next post I'll show you how to split up the build.tf file in a better way so you can align more with a DevOps approach.


Friday, 19 January 2018

Device 'New SCSI controller' is a SCSI controller engaged in bus-sharing.

Device 'New SCSI controller' is a SCSI controller engaged in bus-sharing.


One of those "Dooh..." moments. I'm creating a SQL cluster in my Lab with a file share witness and was trying to add the RDM shared disks. I kept running into a configuration error listed above and as this was my lab tried a few things to get around it. Turns out I had taken a snapshot of both VMs so I could roll back changes and even though this was on the OS drive attached to the default SCSI controller and I was adding a second SCSI Controller to connect the RDMs to with bus sharing enabled, it blocked me from adding it. 

It didn't say anything about snapshots, which is why it took me a while to figure out if it was a 6.5 gui issue or something else! 

The annoying error:
Proof I got past this step:
This might save someone else a few minutes via Google! 


Thursday, 7 December 2017

Browser errors accessing VMware web clients

Browser errors accessing VMware web clients


I've been hitting a strange error when using my Lab at home that I'd thought I'd share here. IPMI and the VCSA appliance interfaces both work but the ESXi UI and vCenter web interface all fail on multiple browsers:

Here is the result "Secure Connection Failed" from Firefox:

Here is the result "This page isn't working" from Chrome:


This was confusing the heck out of me. I checked my Hosts file was pointing at the right locations, that the URLs were good - different browsers didn't matter. I thought perhaps some older encryption method wasn't supported in my browsers anymore but then tried disabling my antivirus. I'm using Bitdefender and after disabling it the URLs started working. Until today I couldn't figure out how to add exceptions/exclusions so there is how I did that:

I added in the vCenter URL and IP of the ESXi host and straight away was fine again. 
We've recently seen an issue where a Flash issue stopped IE working but this was slightly different. This might help someone else out there stumbling on the same thing! 

Wednesday, 6 September 2017

Migrating to VCSA 6.5 U1

Migration to VCSA 6.5 U1


I've been working with a customer migrating vCenter 5.5 U3 to VCSA 6.5 U1. They had a lab to test against and the upgrade there went fine but when we got to the first Production vCenter it turned out to be a very different story!

I'm writing this post to gather my thoughts and offer tips that will help you when it comes to your turn!!

The first stumbling block was that the vCenter SSL certs had expired. These were the ones replacing the original self signed ones. We tried a number of methods but ran into problems re-registering the inventory service with SSO. Time to reinstall and keep the old database. We backed up the license keys and permissions just in case and uninstalled ALL the vCenter components. The simple install failed. The advanced install also failed on the SSO. It just kept rolling back. We logged a call with support and they guided us through cleaning out the %temp% folder as it turns out VMware likes to reuse the crap that's in there. We then install the Pre-Req's by hand - see KB2059481 for info. There were also 2 x CIS folders to delete, see the same KB. Once we'd done that SSO installed fine and we ran though the other services up to Update Manager. Oh, how I wished we'd stopped before that though!!

We ended up re-running the migration EIGHT times in total at 1-2 hours a pop before we finally got it to work all the way through. One of THOSE migrations!! The first issue was when we could see it zipping up some vum files on the old vCenter where the migration assistant runs. Shortly after that it would fail with "The compressed (zipped) folder is invalid or corrupted". A google search found lots of others with similar issues but no relevant KB article. The guidance was uninstall Update Manager and take the database offline and try again. That didn't work. During the next migration it still found & zipped Update Manager components from somewhere despite it being uninstalled and the database no longer being online!! Turns out the migration assistant works off another directory and keeps the Update Manager components there and in future attempts grab the old files and tries to use them where it fails....again!!!! Crapola.

Here's the process we worked out to get you the best chance of pulling off the migration. Repeat these steps between each migration attempt as necessary.


  1. Uninstall Update Manager, get rid of it - take notes or whatever but seriously, kill the damn thing
  2. Take the database offline
  3. Delete all files in the %temp% folder - go up a level if it drops you into %temp%/2 or somewhere like that - the users temp folder would be somewhere like "C:\Users\Bozo\AppData\Local\Temp" - remove everything BELOW this directory
  4. Delete the C:\Users\Michael\AppData\VMware folder and everything below it - this is where the migration-assistant folder lives and its contents are going to screw you everytime until you castrate 'em! 
  5. Create a local admin account with admin privs to get you out of a hole if you've to rollback as the server's computer account is transferred to the VCSA and you will have to rejoin AD. If you know your local admin account password, great, but TEST it!! Or you'll get locked out. Good luck with that. 
  6. You need a VCSA port group that is configured for ephemeral ports, get this ready or you won't see any valid port groups listed in the migration wizard!
  7. Configure the security settings "MAC Address Changes" and "Forged Transmits" to Accept on this Port Group. You can move the VM to another port group once the migration is finished but if you run the migration process enough times your feckin' VCSA network port will end up BLOCKED as it keeps appearing with a new MAC addresses each time you try and if the port gets blocked, guess what, you've to start all over again as it fails the migration process!! 
  8. Disable HA/DRS on your clusters temporarily if you can
  9. Expect to sail through on your first attempt or face hours and hours of pain and frustration, it's gonna go one way or the other! 
If you reinstall vCenter like we did, once you remove everything from add/remove programs, probably a good idea to remove VMware folders from both program files folders and programdata for good measure. You'll need to reconnect your ESXi Hosts after the reinstall, there's a way to script this out there somewhere. 

You'll find once this works (the migration) your hosts are still connected and your vCenter license is set to expire 59 days later so get to that. Check your SSO Admin password expiry is appropriate. Move onto your next vCenter and hope it gets easier!! Best of luck and did I mentioned that if the starting PortGres database message takes a few hours, just wait a bit longer!! Good Luck!!