Terraform - Azure
This post follows on from the previous ones and demonstrates using Terraform to create an Azure IaaS VM, just for kicks!
Install Azure CLI 2.0 and from a command prompt or powershell type "az" and press enter. You should now see Azure commands available for your enjoyment!
https://docs.microsoft.com/en-us/cli/azure/install-azure-cli-windows?view=azure-cli-latest
Now to login you type "az login" and follow the instruction to authenticate. You copy the URL and enter the given code to authenticate the CLI.
Next, set your subscription ID as follows:
az account set --subscription="<SUBSCRIPTION_ID>"
If you have access to multiple subscriptions this is where you spend a bit of time checking you're targeting the right one! Or don't do this on a Friday....!
Next query the following IDs:
az account show --query "{subscriptionId:id, tenantId:tenantId}"
Copy these to Notepad for later.
Next create Terraform credentials for it to use:
az ad sp create-for-rbac --role="Contributor" --scopes="/subscriptions/<SUBSCRIPTION_ID from above>"
This gives you the appId and password you'll need.....copy these out to notepad also to make the next step easier. Let's say this is the output from the previous step:
"appId": "7654321",
"displayName": "azure-cli-2018-02-09-09-23-18",
"name": "http://azure-cli-2018-02-09-09-23-18",
"password": "abcdefg",
"tenant": "1234567"
This is the command you need to edit:
az login --service-principal -u SP_NAME -p PASSWORD --tenant TENANT
So, open a new powershell or command prompt and in this case we would enter:
az login --service-principal -u "http://azure-cli-2018-02-09-09-23-18" -p "abcdefg" --tenant "1234567"
I've replaced by GUIDs here to show which field maps into the command. This should authenticate you within a second or two and then you can test with a simple query as follows:
az account list-locations
or
az vm list-sizes --location northeurope
Now setup a blank folder and the terraform.exe in it and copy the following file as terraform_azure.tf into it. Replace the Azure Provider section AND ssh key with your own values (Highlighted).
terraform_azure.tf
variable "resourcename" {
default = "myResourceGroup"
}
# Configure the Microsoft Azure Provider
provider "azurerm" {
subscription_id = "XXXXXXXX"
client_id = "XXXXXXXX"
client_secret = "XXXXXXXX"
tenant_id = "XXXXXXXX"
}
# Create a resource group if it doesn’t exist
resource "azurerm_resource_group" "myterraformgroup" {
name = "myResourceGroup"
location = "northeurope"
tags {
environment = "Terraform Demo"
}
}
# Create virtual network
resource "azurerm_virtual_network" "myterraformnetwork" {
name = "myVnet"
address_space = ["10.0.0.0/16"]
location = "northeurope"
resource_group_name = "${azurerm_resource_group.myterraformgroup.name}"
tags {
environment = "Terraform Demo"
}
}
# Create subnet
resource "azurerm_subnet" "myterraformsubnet" {
name = "mySubnet"
resource_group_name = "${azurerm_resource_group.myterraformgroup.name}"
virtual_network_name = "${azurerm_virtual_network.myterraformnetwork.name}"
address_prefix = "10.0.1.0/24"
}
# Create public IPs
resource "azurerm_public_ip" "myterraformpublicip" {
name = "myPublicIP"
location = "northeurope"
resource_group_name = "${azurerm_resource_group.myterraformgroup.name}"
public_ip_address_allocation = "dynamic"
tags {
environment = "Terraform Demo"
}
}
# Create Network Security Group and rule
resource "azurerm_network_security_group" "myterraformnsg" {
name = "myNetworkSecurityGroup"
location = "northeurope"
resource_group_name = "${azurerm_resource_group.myterraformgroup.name}"
security_rule {
name = "SSH"
priority = 1001
direction = "Inbound"
access = "Allow"
protocol = "Tcp"
source_port_range = "*"
destination_port_range = "22"
source_address_prefix = "*"
destination_address_prefix = "*"
}
tags {
environment = "Terraform Demo"
}
}
# Create network interface
resource "azurerm_network_interface" "myterraformnic" {
name = "myNIC"
location = "northeurope"
resource_group_name = "${azurerm_resource_group.myterraformgroup.name}"
network_security_group_id = "${azurerm_network_security_group.myterraformnsg.id}"
ip_configuration {
name = "myNicConfiguration"
subnet_id = "${azurerm_subnet.myterraformsubnet.id}"
private_ip_address_allocation = "dynamic"
public_ip_address_id = "${azurerm_public_ip.myterraformpublicip.id}"
}
tags {
environment = "Terraform Demo"
}
}
# Generate random text for a unique storage account name
resource "random_id" "randomId" {
keepers = {
# Generate a new ID only when a new resource group is defined
resource_group = "${azurerm_resource_group.myterraformgroup.name}"
}
byte_length = 8
}
# Create storage account for boot diagnostics
resource "azurerm_storage_account" "mystorageaccount" {
name = "diag${random_id.randomId.hex}"
resource_group_name = "${azurerm_resource_group.myterraformgroup.name}"
location = "northeurope"
account_tier = "Standard"
account_replication_type = "LRS"
tags {
environment = "Terraform Demo"
}
}
# Create virtual machine
resource "azurerm_virtual_machine" "myterraformvm" {
name = "myVM"
location = "northeurope"
resource_group_name = "${azurerm_resource_group.myterraformgroup.name}"
network_interface_ids = ["${azurerm_network_interface.myterraformnic.id}"]
vm_size = "Standard_DS1_v2"
storage_os_disk {
name = "myOsDisk"
caching = "ReadWrite"
create_option = "FromImage"
managed_disk_type = "Premium_LRS"
}
storage_image_reference {
publisher = "Canonical"
offer = "UbuntuServer"
sku = "16.04.0-LTS"
version = "latest"
}
os_profile {
computer_name = "myvm"
admin_username = "azureuser"
}
os_profile_linux_config {
disable_password_authentication = true
ssh_keys {
path = "/home/azureuser/.ssh/authorized_keys"
key_data = "ssh-rsa AAAAB3Nz{snip}hwhqT9h"
}
}
boot_diagnostics {
enabled = "true"
storage_uri = "${azurerm_storage_account.mystorageaccount.primary_blob_endpoint}"
}
tags {
environment = "Terraform Demo"
}
}
The values you need to replace are a little confusing at first, here is a mapping:
ARM_SUBSCRIPTION_ID=your_subscription_id
ARM_CLIENT_ID=your_appId
ARM_CLIENT_SECRET=your_password
ARM_TENANT_ID=your_tenant_id
I copied the previous CLI output to Notepad and stitched together what I was after. The CLIENT_ID in particular confused me at first.
"subscriptionId": "1020304050",
"tenantId": "1234567"
"appId": "7654321",
"displayName": "azure-cli-2018-02-09-09-23-18",
"name": "http://azure-cli-2018-02-09-09-23-18",
"password": "abcdefg",
"tenant": "1234567"
So from the above this is what we should have after you put in your values:
subscription_id = "1020304050"
client_id = "7654321"
client_secret = "abcdefg"
tenant_id = "1234567"
You have everything you need, just take your time piecing it together. Then you can use this again and again later. If you've access to multiple subscriptions, be careful here!!
One last thing - the"ssh-rsa" line needs to be updated with a valid key or you'll get an error. To do this download puttygen.exe and click generate with the default RSA parameter option. You can copy out the entire key field and paste it as follows between the quotes. So from this:
key_data = "ssh-rsa AAAAB3Nz{snip}hwhqT9h"
to
key_data = "ssh-rsa AAAAB3NzaC1yc2EAAAAB<snip>y/uvk+dBZ2REP4Uatw== rsa-key-20180209"
It's a LOT longer than that, trust me! Now enter a pass phrase and save the private key to test the new vm shortly.
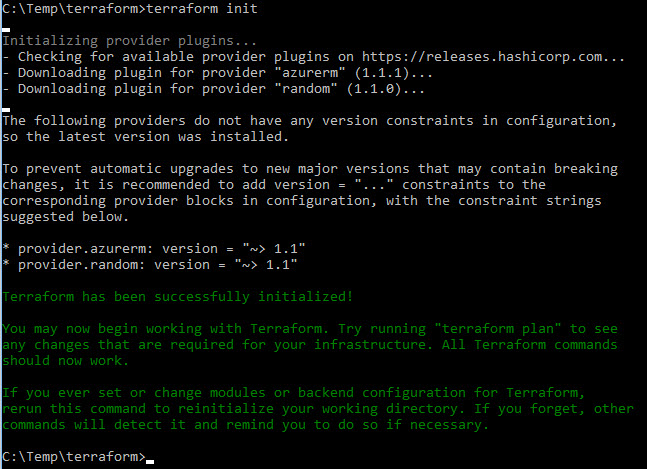
Run "terraform init"


https://docs.microsoft.com/en-us/azure/virtual-machines/linux/terraform-create-complete-vm
https://docs.microsoft.com/en-us/azure/virtual-machines/linux/terraform-create-complete-vm#complete-terraform-script
We run "terraform apply"

Truncated here for boredom.....

Once finished use this to get the public IP:
az vm show --resource-group myResourceGroup --name myVM -d --query [publicIps] --o tsv
Then test by connecting with putty/ssh and that private key you used earlier!

Here is the Azure Portal View:


Finally we can destroy everything:


So in this example we used the Microsoft documentation to generate an Azure VM and all it's associated objects and resources via Terraform, and connect to it.
The official Terraform Azure Provider documentation is here but I didn't need to use it in the end:
https://www.terraform.io/docs/providers/azure/index.html
Like before you can craft the file we used here into multiple files to capture variables and data separately. If you want to have more fun try this with Amazon but that's where I'm going to hold it for now. I've some VVOLs to play with next.....!!