Monday, 24 August 2015

Home Lab - Upgrade

Home Lab - Upgrade


Well, after a few months of researching I finally upgraded my home Lab. I was primarily aiming to get rid of the 32GB limit and also get a few more cores and I'm well past that now and everything is running away merrily. I've also got an Intel NUC as a compute target when using Cloud/VDI configurations which is nice. The only issue was a Noctua Heatsink blocking the use of two memory slots, I changed this for a Supermicro one and apart from the fan noise, I'm now running with all 8 memory slots fully populated.

Lessons learnt:


  • EATX has two sizes so it's NOT a standard as such, check your case manufacturer's website for their definition against the motherboard manufacturers actual size! 
  • Heatsinks may say narrow ILM compatible but you may find they don't allow for the way some motherboards place the memory slots beside the CPU socket and therefore you will run into problems. I bought two expensive Noctua narrow ILM compatible heatsinks to find they are not suitable. The Supermicro heatsinks are fine but I've to replace the fan with a quieter 60mm version. 
  • Power requirements are not as bad as I feared. I was running < 100 kWH with my old Baby Dragon rig and now I'm running at around 150kWH, I was budgeting for up to 300! 50% extra for 4 times the Ram and 2 times the # cores! 
Heatsink issue :

Noctua with Fan Removed (Left two memory slots blocked by angled heatpipe):
(Noctua NH-U12DX i4 Xeon Cooler)
Supermicro Designed for 2U Servers, lower profile & noisier 60mm fan):
(SuperO SNK-P0048AP4 2U LGA2011)


EATX:
I won't show you what I did to mount the motherboard, I'd be embarrassed because the case was not compatible, I could use about 3 screw holes and that was it! I used plastic standoffs and cable ties for the rest and hope that the PCI cards take some of the strain! I love the case though, it's a Corsair Carbide 540 High Airflow ATX Cube Case and very easy to work with. I had a Lian Li for the Micro-ATX build before but it's SO difficult to work with the SSDs I gave up and went large. I didn't want a full tower case so a wide one was great until I found it didn't take the new motherboard as well as I'd assumed! 

Kit List:


Motherboard:
SUPERMICRO MBD-X10DRI-T-O 
Got this from Newegg in USA. Had a LOT of difficulty with this part. At first I ordered an open box one saving me $100 then they had issues with payment. When I went back to reorder the open box one was gone or stuck in the system. I ended up paying full whack. I get it sent to a shipping forwarded and they too took a cut, they charge by "dimension weight" so even though it's not that heavy an item, it cost a LOT to send on to Europe. The other problem was they couldn't get hold of an export code classifying the type of computer item. Supermicro in the Netherlands came back to me within an hour with the code when I asked them and we were all set! More happened but it eventually turned up and I got hold of it!  

ECCN Notes: 
Export Code for all Supermicro Motherboards with IPMI - ECCN=5A002
Export Code for all Supermicro Motherboards without IPMI - ECCN=5A992
support@supermicro.nl

I went for this board as it was only an extra $60 for the 10Gb ports for future expansion and while I planned on using one CPU initially and 8 slots of ram, I could grow later. I was lucky to get a great price on the CPU via ebay, I stayed away from Engineering Samples...! No problems with the board, just made sure none of the standoffs could cause a short and it powered on first time. The IPMI and Motherboard Bios were all bang up to date too which was a bonus!

Heatsinks:
Noctua NH-U12DX i4 Xeon Cooler
replaced by 

Supermicro SNK-P0048AP4 2U LGA2011
and
GE4084 ITR-XR-1 Noiseblocker BlackSilent Case Fan Fan XR1-60mm

Power supply:
XFX 650w P1-650B-BEFX GOLD PSU
This has connectivity for BOTH 8 pin motherboard power supplies to be attached together in addition to the main 24 pin one. So if I run some heavy CPUs in the future, this should cope fine. I'm not getting the best efficiency currently as I'm well below 300 Watts, the optimum but so be it! 

Memory:
Crucial 64GB Kit (16GBx4) DDR4 2133 MT/s (PC4-2133) CL15 DR
(CT4K16G4RFD4213)
I can go to 256GB of ram without a sweat (except to my pocket!) when I add a second CPU someday. By then 32GB modules may be feasible. 

CPU:
I spent most of time time looking for the ideal CPU. I got hold of an Intel E5-2618L v3 thanks to a brilliant deal on E-Bay. This is a 75W CPU but has 8 cores and high enough boost clock speeds (2.3GHz base vs 3.4GHz boost). My previous CPU was faster per core but this one is more energy efficient and gives me room to deploy larger VMs. A 2630L or 2650L would have been nice but none appeared in my price threshold, after a year or two they may be more of them around....
http://ark.intel.com/products/83351/Intel-Xeon-Processor-E5-2618L-v3-20M-Cache-2_30-GHz


SR-IOV Notes: 

FYI: if you want to play with SR-IOV you need to enable it specifically in the Bios here:

Then you can enable in the Host Physical Network Properties in VMware and assign a port to the VM after a reboot. I've connected the 10Gb ports to a 1Gb switch and was able to ping out from the VM fine, letting me see how this works for the first time! 

Intel NUC:

 
Not much I can say, it works fine and doubles as a windows media player by removing the USB with ESXi on it. I've a mSATA drive with windows, USB for ESXi and 2.5" SSD for VMware Storage all sitting in a nice 2014 generation NUC! I wanted to see what these were like to work with and so far so good. It does get into a state currently after booting it up saying the host is not able to power on VMs, disconnecting the Host and reconnecting it fixes this issue. Otherwise grand, might be a power saving issue or something creeping in. The UEFI Bios is nice too! I got this from the USA on E-Bay at a nice price. Just remember you're getting an empty box, you need to get a suitable power cable and memory/ storage before you get going. Don't forget a mouse/keyboard for the initial configuration. This model doesn't come with Intel vPRO for remote configuration. 

The NUC is maxed out with 16GB Ram but this is perfect for a few VMs when doing VDI/Cloud Labs. There is only a single 1Gb NIC but so far this hasn't been an issue for me. I may well replace it eventually with an Intel Xeon-D 1520/1540 down the road if I need more horsepower but for now it's a versatile and tidy, power lean package! It worked with distributed vSwitches which I can't risk on my main server as any changes of hardware etc and you're asking for trouble! 

So, that's it, enough to bankrupt me for the rest of the year and hopefully give me loads of scale to work with as I go. I'm doing my VCP-DCV6-Delta next week so glad to have this all behind me so I can put it to good use! 


Tuesday, 4 August 2015

Why a Home Lab?

Why a Home Lab?

I've been lucky enough to have a home lab to play with for the last few years. It helps to get to know different aspects of technology and software to help me in my job. Rather than get into the exact hardware and options in my Lab I thought I'd take a stab at why it's been useful to me, so if you're considering one you might find some of my uses resonate?:

  • You're responsible for the hardware. Both in terms of selection and price. You can spend as much or little as you want. If it breaks, you're on the spot to fix it. This can give good experience in troubleshooting but sometimes leave you scratching your head and looking for help. There a certain satisfaction when you configure & get something working for the first time! Also seeking out useful upgrades and how to best put them to use.
  • You have exclusive use of the hardware. Unlike work labs which can be unrecognisable by the time you come back to it a few months after being "reconfigured" by well meaning colleagues, you spend as much time putting it back together as you do using it for what you intended in the first place. Yes, the employer pays the electricity and it can be left switched on but few employers see any value in it as an investment. You're probably going to be left with old unwanted hardware and ram or cpu limits you can't do anything about! There are some good scroungers out there that can always add value but it's an uphill struggle.
  • Exams. Probably the main reason I went with a home lab is to study for exams. It gives me a chance to break things, and mess about without worrying about annoyed colleagues or customers giving out! I get to play around in advance of a project with new software and make sure I avoid the pitfalls when I'm onsite.
  • Blogging. I've started blogging about my experiences using my Home Lab to build different technology solutions. It's at a very basic level but I've often used the posts myself down the road to refer to doing something I don't do often enough to become second nature. Some customers want LDAP & SSL, some don't etc.
  • Faster Upgrade Cycles. You can upgrade as soon as new software comes out, you're not limited to being tied into compatibility issues or breaking backups. You know the risks going in and revert if it fails or wait it out until a patch arrives. Be bleeding edge at home, not at work! Want to see what all the fuss is about, stick it in your home lab!
  • Looking at new versions of Products before I see them in future Projects. So at least I'm not installing something for the first time onsite....! I can test out particular use cases and find out what works, what breaks and what to avoid.
Disadvantages:
  • Expense. You probably can't afford 3 x €20,000 servers and a SAN plus a 3KVa power upgrade to your house unless you're deriving direct revenue from your home lab, are you hosting a cloud or something?!! While I would love to go 10Gb Ethernet as an example, the PCI cards are €300+, a switch €1 to 4,000 which is crazy. I would love a faster processor and more Ram but where does it end? You don't get tax back unless you're self employed. So, pick your features carefully - does the new hardware do something you can't do currently? Will this provide the ability to play with features you can't access currently and see them in operation? Would nested hypervisors work at all? What other options do you have? Boat loads of 1Gb?! Know your limits...you might not be able to replicate every technology in your Lab but if you're smart you'll manage on the job....
  • Scale out - the model where you scale out to multiple servers increases expense - you need shared storage and you've probably tripled the costs of your host hardware. If you want to upgrade, you need 3 of everything, think about that. Amazing if you have the money, but for me not the way to go. I prefer to Scale Up at home!
You can use Cloud to do a lot and it probably works out cheaper, you pay as you go. There are certainly months that go by and my lab doesn't get powered on which feels like a poor ROI. But....I'm only paying for electricity when I do power it on at that point. The thing I don't like with cloud is you pay for every vCPU, I'm not sure nested would work great or at all, when I own pCPU I can get major overcommit without paying extra. It's only where a particular appliance needs 8 vCPU and I've only 4 pCPU I run into trouble. Or if it needs more Ram than I can afford, another issue!

So, plan carefully, take your time, look for bargains on ebay. Do you want a second hand server at a bargain or build your own? Get a parts list off another blog and see what you would go with or change. Watch out for risks regarding power supply and other key compatibilities. You don't want to hook everything up like I did and power on to discover the motherboard needs a BIOS upgrade to recognize your CPU model! I had to buy a cheap CPU to perform the Bios flash!

My own Lab is based on a 4 core CPU and 32GB Ram. That's the max it can support. Right now I'm in the process of scaling up to remove these limits so I can drop in more Ram or CPU as needed. It's going to be the most expensive home lab investment I've made yet but I can start with a wide foundation and build up over the next year to something I can throw nearly anything at. Having to start a whole new system just to break one barrier (# cores, # ram) makes me think bigger. So consider what the physical limits are and when you're likely to hit them.

I think I'll leave it there. I'm amazed by the variety of home labs other people have blogged about and if it works, go for it. Get a balance between cost and functionality, pay attention to power and noise to keep the partner happy and see if you can access it remotely (smart plug to power it on, auto boot, auto VM startup, RAS solution - Bridged router, DDNS etc) so you can refer to it at work to look at something and not be limited to just using it when you're at home......and enjoy! You can always switch it off and walk away to catch up on some on demand TV! Life is outside the door so stick your head out once in a while to remind yourself what the sky looks like!


Saturday, 18 July 2015

HP vPv installation

HP Virtual Performance Viewer - installation & configuration

It's been a while since I looked at vPv, so now that a new version has been released (2.20) I thought I'd capture the install into my Lab below and go through some of the features you can check out. You can download the Product from here:

http://www8.hp.com/us/en/software-solutions/vpv-server-virtualization-management/try-now.html

Once installed it goes into a community edition mode but you can switch to a 60 day premium edition to try out the more advanced features. The OVF is about 1.26GB so not too bad.

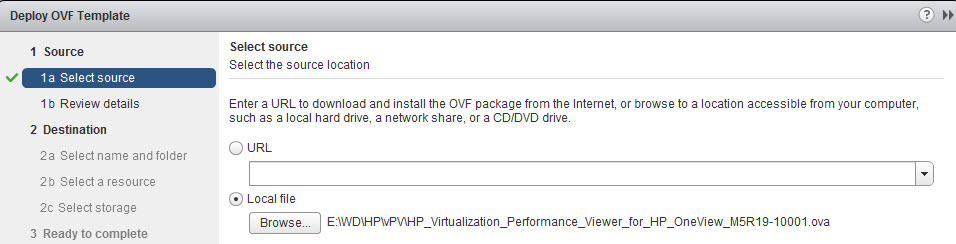
Go to the vSphere Web Client and deploy the OVF - right click the VM Folder you want to deploy to and click Deploy OVF Template

Browse to the location of the OVA file and Click Next
Click Next
Click Accept and Click Next

Enter a Name for the vPv VM and Click Next
Choose an appropriate configuration size, there are three choices, small above and medium and large below with different virtual hardware requirements

Select an ESXi Host and Click Next
Select a Datastore and Click Next
Select a Network and Click Next
Enter in the appliance network configuration appropriate to your environment, Click Next
Click Finish and the OVA will be deployed
 
The VM then powers on with the following hardware for a small deployment in my case
 
Go to the following URL to connect to your new appliance (no logon required)
https://192.168.10.21:8444/PV/
(Change the IP / Hostname as appropriate)

Click Add Datasource and you can see there are a good few options, more than just VMware!
If you have all these environments you'll love this tool! I'll just add in my vCenter Server
Click Test Connection, than Add if successful. Note: I tried using administrator, lab\administrator, administrator@lab.local but it doesn't appear to like AD credentials, the Test Connection fails each time. The SSO logon is fine however.
You are currently using a community license but you can change this to get at more interesting features
Click Start Evaluation License

Click Ok
Check the license options, you're now running in Premium Mode (I don't think you can just test Express but you may as well try ALL the options in Premium!!). There are Server and OSI licensing models but speak to your HP account contact for pricing.
The trending and forecasting can take a few days to load sufficient data to start giving you accurate reports and trending.


There is also an agent you can install on the guest VMs to get more accurate information. You can then start to see the relationship between applications (Business View) was the Infrastructure View.

The monitoring agents for different operating systems are available
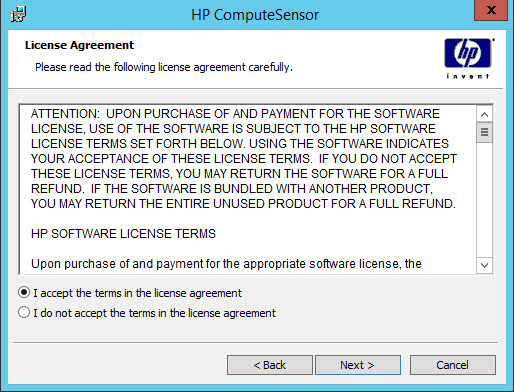
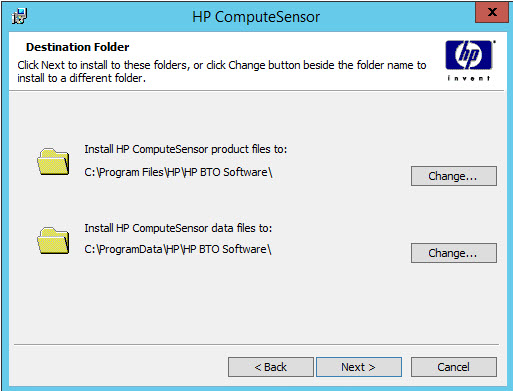
Copy the MSI or installer file to the VM and execute it, a windows install is given as an example here

Click Next
Click Next
Click Install
Wait for the install to finish
Click Finish

Now, I'm not sure about the next section - you can get Guest OS Drilldown for the vPv box but I've not got it working with two VMs as yet. The settings below may not work / be the right approach:

Now tell the monitor agent where the vPv server is - edit the hpcs.conf file in the path above with values similar to below - don't forget to take out the ";" at the start of the line!

[hpcs.hbp]
; Use the following line to push HBP events to a target hpcs acting as
; a registry.
http://192.168.10.21:8081/hbphandler=/lwiregistry/up
; HBP interval in seconds. Default value is 90.
interval=90


Update the contents with the IP Address of the vPv appliance and restart the service listed above.
Now I can tell you where you find the resulting Guest OS Drilldown as it took me a few minutes!
Capacity, Overview, and either View VMs by CPU Sizing or View VMs by Memory Sizing
Next Click the icon above across from the VM you want to examine, this is what I'm missing currently but the one for the vPv server should be available.

Enjoy the stats - click on a brown word to get more detailed stats!
You can also change the interval on the top right.


Next configure CSA integration

I used the following CSA URL:
You can apparently expose a tenants performance information with vPv so you could have a link in their marketplace that provides an add on value add service to give them insight into how their VMs are performing.

You can also integrate OneView to get an Infrastructure View
An Alert Message example is shown above
The Capacity View is shown above. There is a lot of good information to help right size.
Some Forecasting information is shown above.
Some Modelling information is shown above. I think I need to upgrade!


Some Heat Maps (Top: VMs - Compute, Middle: Data Stores, Bottom: VMs - Storage)

There is a Message Board that covers enhancements and FAQs worth checking out:
http://h30499.www3.hp.com/t5/forums/tagdetailpage/tag-cloud-grouping/message/tag-cloud-style/recent/message-scope/all/user-scope/all/tag-scope/single/tag-id/38871/timerange/all/tag-visibility-scope/public

There's plenty more to explore but that should be enough to whet your appetite for now! Worth a look?!


Saturday, 11 July 2015

Simple Openstack Distro

Openstack Distros

I was searching for a simple Openstack Distribution to get my head around how it operates. Many of them require a server with 64GB Ram and multiple VMs or....serveral Physical Hosts to install it on. I was hoping there was a simpler light distribution that could sit on a single VM and it seems there is. The first one I found was from the following site:

www.rdoproject.org

They have a quickstart page you can use to get up and running once you deploy the Linux O/S. Their system requirements are quite light and after getting the RHEL 7.1 trial installed I proceeded to get Openstack up and running thanks to their hard work!

Some Tips: found the C# ViClient wouldn't display the Console after hitting Enter on the RHEL install menu. Switched to web client and it worked ok. I used the vanilla "Server with GUI" option during the install.

Next you may need to disable NetworkManager but I think the issue is now fixed if you pull down the latest RedHat subscription updates. Follow RDO Projects quickstart guide here for the rest:

https://www.rdoproject.org/Quickstart

Some commands I needed to use are listed below

subscription-manager repos --list | more
sudo yum update -y
subscription-manager repos --enable rhel-7-server-optional-rpms
subscription-manager repos --enable rhel-7-server-extras-rpms
yum install -y python-werkzeug
sudo yum install -y https://rdoproject.org/repos/rdo-release.rpm
sudo yum install -y openstack-packstack
packstack --allinone

I found I needed to enable some extra Repositories. Before doing so I had errors regarding missing dependencies of Python. The steps above should get you through it. Once the install completes successfully, open the web page http:// <ip address of vm> /dashboard
Username : admin
Password: in your home directory file keystonerc_admin

My one is:
http://192.168.10.22/dashboard/admin/
The view is below:

Now, Set up a keypair to play with the default cirrus instance or it will fail to deploy and you won't be allowed to delete it! You can install virt-manager to see more info. If you're getting stuck reboot the VM and check all the service are started, clean down any stuck instances and try again:
Admin/System Information/Compute Services etc

Now to run the Openstack commands go to where that password file is and copy it:

cp keystonerc_admin admin-openrc.sh

And now execute the command below:

source admin-openrc.sh

You should now be able to use Openstack commands for instance:

glance image-list
neutron net-list / port-list / subnet-list
nova hypervisor-list
keystone user-list

Note: My install seemed to fail shortly after installing, might be just my environment but play around and see how you get on. Just giving fair warning!