Friday, 26 July 2019

SSL Certificates - vCenter 6.5 with integrated PSC

This will hopefully be a series of posts about deploying signed certificates from a Server 2016 Enterprise CA to a variety of VMware Solutions. I've been installing such certs in a number of VMware Products recently and thought it might be useful to capture the process a bit here.

With vCenter, there are the default self signed certificates of course. VMCA issues self signed certificates to the hosts it manages and you can control the renewal of these.

For signed certificates, you have three main routes:

  • Use the CA to issue certificates to each of the vCenter components and to each ESXi host
  • Use the CA to issue a subordinate certificate to vCenter VMCA and let it sort out the rest!
  • Use the CA to issue certificates to user facing vCenter components and let VMCA handle the rest - HYBRID *VMware's recommended option*
My preference is the Hybrid approach as it's less work, less hair pulling and really deals with the issue of man in the middle head on - it's the people facing admin interfaces which you want to protect most of all. The other interfaces are either not used by admins ever or in the case of the ESXi web interface, rarely. Like when you power down vCenter and have to go searching for which host it was last seen alive on...! 

A lot of customers who have security officers won't be happy with the subordinate CA approach as it gives the VMCA (vCenter's integrated certificate authority) a LOT of power to issue any certificates it like under the Root/Intermediate branches. That can be abused. They usually just say NO! 

They also say no to any wildcard certificates being used. They are handy as you can issue the same cert to multiple products and various common names but it's a fudge and bad security practise. Great for a Lab maybe but not Development and definitely not Production. 

So, assuming Hybrid is the way you want to go, here is the procedure. I'm using vCenter 6.5 update 1 here as I happened to have a nested lab with this version ready to go.

By the way the Blog about Hybrid is here:
Also a walk through is here:

Now, here is my current vCenter SSL certificate (out of the box). Note the 10 year expiration and the path says the issuer can't be found. This is because in a proper CA environment, every time you browse to a secure site you should be able to check in with the CA to see if that particular certificate has been revoked, very important in a security context if the certificate has been compromised. A self signed doesn't do that. 
 

Now we need a new template on the 2016 Server CA for VMware. Duplicate the Web Server one as shown. Click start, run, type in MMC and add in the"Certificate Templates" snap-in to get this UI.
A little bit of editing is required. Set the Certification Authority to Windows Server 2008 and Update the template display name. 


Edit Key Usage and set "Signature is proof of origin (nonrepudiation)


Click Ok and this time edit Application Policies to remove Server Authentication entirely. Check Supply in the request is set in the Subject Name tab. Click OK to save.


Now we need to issue the template. Bring up server manager and from the Tools drop down menu choose Certification Authority. Right Click on Certificate Templates, Click New, Certificate Template to Issue. Select your template and Click Ok.


Now, the handiest way I'm used to issuing certificates is with the old web interface on Server 2016. When you install a CA role it should give you this web enrollment option.
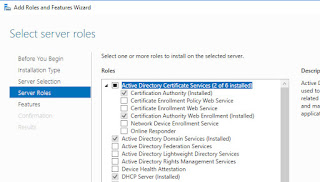
When you browse to http://localhost/certsrv or to this URL remotely and authenticate it will provide you the familiar UI to request and issue certificates. The current setup doesn't wait for approval although this is certainly the way a Production CA would operate so build in some time in your project to allow for certificates to be signed and issued and check for typos before you send in the request or you will have wasted some time in the process. A certificate request can be decoded via openssl or most commercial CA authorities have a web tool so you can check its all spelled correctly. 

Click on Download a CA certificate, certificate chain, or CRL Choose Base 64 and Click Download CA certificate. You now have certnew.cer - keep this somewhere handy. 
Enable SSH to your vCenter - if you haven't already done so browse to 
https://<vCenter FQDN>:5480
You can enable SSH and the Bash Shell in here. 


Putty to the vCenter IP / FQDN and we can start to interact with the VMCA. 


I've changed to the shell interface, set the default to shell so we can use WinSCP later to upload certificates and started up the certificate-manager. We're going to replace the Machine SSL certificate. Option 1 looks like this:

Now load up a copy of WinSCP and connect to vCenter and grab /tmp/vmca_issued_csr.csr and the /tmp/vmca_issued_key.key just in case! 

Back to the certificate web server request page. Click Home and then Request a Certificate. Click advanced certificate request. 


Click the second link, I'm not typing that in here....!!
 
 Edit the vmca_issued_csr.csr in Notepad++ (Get this, it's worth it!) or just use old Notepad from windows. Paste the entire contents into the saved request field below and choose you template we made earlier.
 At this stage in a lab we get our certificate immediately. Change to Base 64 and Click Download Certificate and rename it to something after you vCenter, in my case I called it Labvc2.cer.

If you did this directly on your CA Server, don't start looking for the cert on your local desktop, copy it off the CA server first!!!! Now, remember that certnew.cer root cert from earlier, we need to add that to the signed certificate as the VMCA doesn't have a clue about the CA, this way it's told to trust the certificate and here's the CA cert to prove it's legit. 
Edit the Labvc2.cer and paste the contents of certnew.cer at the bottom, no spaces please....
Upload the file to vCenter along with certnew.cer with WinSCP and we're back to Putty again to install them. I've called my chained certificate Labvc2_SSL.cer. 


Now I got an error first time which was because I'd already registered NSX and vCloud Director with this vCenter, ideally you would replace certificates BEFORE deploying other solutions. The error was in /var/log/vmware/vmcad/certificate-manager.log and stated:
ERROR certificate-manager 'lstool get' failed: 1
Fix:
https://kb.vmware.com/s/article/2150057
https://kb.vmware.com/s/article/1025360

After removing those plugins I tried again:


Success!! That's it. You can verify the certificate is signed for both the Flash and HTML5 interfaces. The appliance :5480 one is not part of the Machine SSL so don't worry about that one....


HPE 3Par path selection policy using Powershell

This post is straightforward enough. I've been SSH'ing into each esxi host up to now to commit two commands which create a custom SATP rule for a 3PAR SAN and to set the default path selection policy for ALUA to Round Robin. I just never got around to doing it through Powershell up to now. 

I've found blog and community posts that deal with the rule creation but they never change the default path selection policy so each new LUN created down the road won't use Round Robin and therefore the new rule is useless. I've captured a script posted by the amazing LucD and extended it to do both steps I needed. I've also included the ESXCLI command and audit scripts I use for reference. 

ESXCLI commands I used up to now:

esxcli storage nmp satp rule add -s "VMW_SATP_ALUA" -P "VMW_PSP_RR" -O iops=1 -c "tpgs_on" -V "3PARdata" -M "VV" -e "HP 3PAR Custom iSCSI/FC/FCoE ALUA Rule"

esxcli storage nmp satp set  --satp=VMW_SATP_ALUA --default-psp=VMW_PSP_RR


Script to set these via Powershell / esxcli V2 on each host:

$hosts = get-vmhost

foreach ($esx in $hosts) {
   $esxcli = Get-EsxCli -VMHost $esx -V2

   $sAdd = $esxcli.storage.nmp.satp.rule.add.CreateArgs()
   $sAdd['boot'] = $false
   $sAdd['claimoption'] = 'tpgs_on'
   $sAdd['description'] = 'HP 3PAR Custom Rule'
   $sAdd['model'] = 'VV'
   $sAdd['psp'] = 'VMW_PSP_RR'
   $sAdd['pspoption'] = 'iops=1'
   $sAdd['satp'] = 'VMW_SATP_ALUA'
   $sAdd['vendor'] = '3PARdata'

   $addResult = $esxcli.storage.nmp.satp.rule.add.Invoke($sAdd)

   "" | Select @{N='VMHost';E={$esxcli.VMHost.Name}},
      @{N='Add_Rule';E={$addResult}}

   $tAdd = $esxcli.storage.nmp.satp.set.CreateArgs()
   $tAdd['defaultpsp'] = 'VMW_PSP_RR'
   $tAdd['boot'] = $false
   $tAdd['satp'] = 'VMW_SATP_ALUA'

   $taddResult = $esxcli.storage.nmp.satp.set.Invoke($tAdd)

   "" | Select @{N='VMHost';E={$esxcli.VMHost.Name}},
      @{N='Add_Rule';E={$taddResult}}
}

Example Output:

VMHost              Add_Rule
------              --------
labesxi02.lab.local true
labesxi02.lab.local Default PSP for VMW_SATP_ALUA is now VMW_PSP_RR
labesxi01.lab.local true
labesxi01.lab.local Default PSP for VMW_SATP_ALUA is now VMW_PSP_RR

Finally to audit LUNs at a later time:

PowerCLI: Check Path Fixed or Round Robin:
Get-VMHost | Get-ScsiLun -LunType "disk" | where {$_.MultipathPolicy –ne "RoundRobin" -and $_.model -like "*VV*"}| format-table VMHost,CanonicalName,MultiPathPolicy –autosize

PowerCLI: Set to Round Robin if LUN were already presented and defaulted to MRU:
Get-VMHost | Get-ScsiLun -LunType "disk" | where {$_.MultipathPolicy –ne "RoundRobin" -and $_.model -like "*VV*"}| Set-ScsiLun -MultipathPolicy "RoundRobin"

Source Blog post with LucD's response:

https://communities.vmware.com/thread/603671

I've used the V2 command as they may deprecate the non V2 esxcli option in the future.

Friday, 25 January 2019

Securing Windows RDP Connections with a Signed SSL Certificate

Securing Windows RDP Connections with a Signed SSL Certificate


This post captures the steps to get Server 2016 to use a signed SSL certificate for RDP connections. I'd been banging my head against a wall on this for a while but finally figured out what I was doing wrong.

Grab openssl here:
https://slproweb.com/products/Win32OpenSSL.html
I'm using my Lab DC as a Certificate Authority. In the customer site they have a separate CA so I use OpenSSL to generate a Certificate Request (CSR) and submit it to them. Nothing special, you can edit the default windows CA template to set particular values but I found the default web server template works fine. Sometimes you won't have direct access to it.

I installed OpenSSL into c:\OpenSSL normally, rather than Program Files as it's easier to find using the command line afterwards to issue commands against.
If you can't find the openssl.cfg file in the bin subdirectory, install the full version (developer) somewhere temporary and copy it over. The smaller 3Mb version should have everything else you need.
Copy and then edit openssl.cfg (i.e. keep a backup!!). You can make life easier if generating several certificates by updating the defaults:

[ req_distinguished_name ]
countryName = Country Name (2 letter code)
countryName_default = IE
countryName_min = 2
countryName_max = 2

stateOrProvinceName = State or Province Name (full name)
stateOrProvinceName_default = Leinster

localityName = Locality Name (eg, city)
localityName_default = Dublin

0.organizationName = Organization Name (eg, company)
0.organizationName_default = Lab

organizationalUnitName = Organizational Unit Name (eg, section)
organizationalUnitName_default = IT

This allows you to hit enter five times when you invoke openssl. You may need / be required to use Subject Alt Names in your request. To do this update the [v3_req] section and add a new one [alt_names] below is as shown.

[ v3_req ]

# Extensions to add to a certificate request

basicConstraints = CA:FALSE
keyUsage = nonRepudiation, digitalSignature, keyEncipherment
subjectAltName = @alt_names

[alt_names]
DNS.1 = labdc.lab.local

If more than one SAN is needed update as follows:

[alt_names]
DNS.1 = labdc.lab.local
DNS.2 = 192.168.1.10
DNS.3 = labdc

Now open an administrative command prompt and switch to the c:\OpenSSL-Win64\bin directory

execute this command and replace the FQDN with your own server's name:
openssl req -new -sha256 -nodes -out Labdc.lab.local.csr -newkey rsa:2048 -keyout Labdc.lab.local.key -config openssl.cfg


You should see the defaults in [] brackets indicating they are active. Just hit enter until you get to Common Name and paste in the FQDN here. Press enter a few more times until you finish the sequence. You can of course add email and passwords as required.
Now you have two files in the folder:
Labdc.lab.local.csr
Labdc.lab.local.key

Go to your CA and generate the certificate and download it using Base 64 encoding
Labdc.lab.local.cer
You can also download the certificate chain but this isn't required
Labdc.lab.local.p7b

You now can generate a PFX file which contains the Private Key. This is where I went wrong! If you install the Certificate without the private key (Just using the .CER for instance) you can't switch RDP to using it.
openssl pkcs12 -export -out Labdc.lab.local.pfx -inkey Labdc.lab.local.key -in Labdc.lab.local.cer
Labdc.lab.local.pfx

Install this PFX file in the Server's local computer certificate store


The key is to ensure you see the "You have a private key that corresponds to this certificate" here.

Now switch RDP to use this certificate. Open an administrative PowerShell session to get the thumbprint of the cert you want to use:
Get-ChildItem "Cert:\LocalMachine\My"


So in my case it's the first one listed - I've confirmed this by checking against the Certificate Details as shown. Copy the Thumbprint out of the powershell session and use notepad to create the next command replacing the Thumbprint placeholder:
wmic /namespace:\\root\cimv2\TerminalServices PATH Win32_TSGeneralSetting Set SSLCertificateSHA1Hash="5162EC70680B1AF4FF42C697C3168B0F77DA20A9"

Now use the command below to check the current Thumbprint in use:
get-wmiobject -class "Win32_TSGeneralSetting" -namespace root\cimv2\terminalservices -filter "terminalname='RDP-tcp'"


We now run the command prepared in notepad earlier with YOUR Thumbprint (replace mine!!) and set RDP to use it:

Verify with the same command as earlier:

Yep, that looks good. Now disconnect and reconnect with RDP and test that the certificate works. If you use an IP Address it should give you a warning unless that's in your list of SAN entries too, if you use the correct FQDN you should no longer get a warning if the local PC you're using trusts the RootCA.
If the Root CA isn't trusted of course, add it in! When you open the issued certificate you should see the full chain under the certification path section:
That should do it. Hope this helps someone out. The Private Key is the main reason I ran into problems. Ensure you import this and you're good to go. This was tested on Server 2016 and no animals were harmed during this process.

Monday, 2 July 2018

Enhanced Linked Mode with Embedded PSC

Enhanced Linked Mode with Embedded PSC


The latest 6.5 U2 and 6.7 release support enhanced linked mode when used in a greenfield site. I was a bit confused over how this is done so decided to lab it just to see the steps required.

"With vCenter Server 6.5 Update 2, you can deploy by using the GUI or CLI installer up to 15 vCenter Server Appliance instances in Embedded Linked Mode, and manage these instances with the vSphere Web Client or vSphere Client from any of the instances."

So start with I'm using 6.5 U2 VCSA ISO and the deployment is in two stages as per normal. I choose embedded PSC:
 I wait for the deployment to process:
 Now for Stage two:
 Standard Stuff so far:
This is the key screen. You can setup the first VCSA with a new SSO. Later I'll join an existing SSO domain on my second VCSA deployment and see what happens.
Here is my vCenter up with a test host added:
Now I'll deploy the second vCenter and same story for part 1. Now I've just spotted an issue from the release notes:

Second node in Embedded Linked Mode might be deployed in a new site with the default site name regardless of the first node configuration
If you configure a vCenter Server instance in Embedded Linked Mode on a site with a name of your choice and then you add another node, the second node might be deployed in a new site and get the a  default name, regardless of the first node configuration. This issue is specific for the GUI installer of vCenter Server Appliance and not for the CLI installer.
Workaround: None. Site names in vCenter Server Appliance configured in Embedded Linked Mode by using the GUI installer must default to Default-First-Site and not be modified. 
Oh, great, stick with the site name defaults then. Too late for me, let's see what happens!

I've grabbed the following screenshot from the second part of the deployment phase which shows me joining the existing SSO:
Hmmm...no sign of being able to choose a different site name so I'll need to check both appliances after the second is finished to see what the two SSO site names end up as!!! Will ELM work or not, that's the question!!
So, here we are - looks ok - ELM see's both vCenters and VMs.
This is labvc01:
 It has the custom site name

This is labvc02:
This one defaulted to the default site name as per release notes.

Now, in vSphere 6.7 Sites are deprecated, i.e. no more sites so no worries. For now I would leave the Site to default and leave it well alone! The issue with the settings above is if I wanted to point vCenter at the other PSC in a DR scenario, as it's in a different site, that's not possible!!
https://communities.vmware.com/thread/587203

Now, let's try again and this time stick to the default site name:
 I tried leaving the two fields blank but you're forced to write something into them. Get this - the default site name shown is WRONG! Don't type in "default-site", type in "Default-First-Site" as shown below:
Validate with these commands (enable SSH during install!):
https://kenumemoto.blogspot.com/2017/06/vcsa-65-how-to-find-which-psc-your-vcsa.html

To find your SSO Domain Name:
/usr/lib/vmware-vmafd/bin/vmafd-cli get-domain-name --server-name localhost

To find your SSO Site Name:
/usr/lib/vmware-vmafd/bin/vmafd-cli get-site-name --server-name localhost

To find you which PSC your vCSA is pointing to:
/usr/lib/vmware-vmafd/bin/vmafd-cli get-ls-location --server-name localhost
So far, so good. Now let's look at the second one:
So, same settings as before and after it's finished we can check the site info using putty:
All looks fine now:
Once those Site Names match you're good to go.....Hope this saves someone a few minutes out there!

Tuesday, 27 February 2018

vRealize Operations Musings

vRealize Operations Musings


This post is a quick delve into the world of vRealize Operations. Let me state up front I'm not a fan but I thought I'd try and trace why and have a fresh look at the product to find some good points that would help balance my perspective a bit!

I was responsible for the delivery of Microsoft System Center Operations Manager back in the day for about a year on and off. I thought then and still do that it's over-engineered. You can tell from some products if they were designed well and intuitive to use, and others where nothing is how you'd expect it.

I read a book a few months ago about design theory, related to doors and things like that. A glass door with no obvious handle will confuse people as to which way it opens and via which side, cue broken nose or broken glass everywhere. My opinion is SCOM is like that. VMware vRealize Operations echoes that feeling to me but is no way as bad, but still it's not in a good place compared to other software products I work with which is a shame.

To give you an example - cue how to add a vCenter into vRealize Operations:

When you first log into vRealize and the dust is settling you see this:
Ok, I thought, where do I add my vCenter. I click on the plus and get this:

What's a PAK file?!! Do I need one? That's what I mean. You have to highlight the VMware vSphere solution on the previous screen, then click on the configure cogs button to get this:
Intuitive? Hardly! 

I've already added mine here, seems ok? Wait until you get to the credentials section, type in administrator@vsphere.local and have a laugh to yourself! You have to add a credential - see the plus beside the credential area to get this:
Ok, so it's not a big thing but these two items are enough to trip me up for 5 minutes, figuring out where and why. I know there's documentation but if you've worked in IT for a few years is it too much to expect that you will get a more intuitive start to the product. This is key as this is the impression that will stay with you. I know, it's stayed with me...!

It's that kind of structure that determines how much you're going to like playing with a product long after you've gotten it working the way you want. Take reports as an other example. You can output basic inventory reports, I did so and got blank, zip, nada detail in them:
So I chose to get a Hardware Summary. You need to highlight the report, THEN click the play button on the taskbar (no right click here) - again why is it designed this way, the second from last icon?!!!!! WHY????!! Then you get to choose from the following:
So, the defaults look good, let's go with vSphere World, right? This is the result:
There are two problems here, the lack of data and the formatting. Let's fix the data first, you need to run the report but choose THIS fecker from the non default drop down list:
So instead of the default "custom groups" at the top, I chose "all objects" and then pointed the dozy product at my only connected resource, my vCenter Datacenter. Not exactly hard but completely irrational for a VMware Product. This is the result:
I love the thought that went into the header, footer, 1st page VMware logos and index but there's one small problem, the 40 pages of content looks like the above. Now, you do have a CSV option but we all know that requires a little massaging. If I wanted to schedule a report to email itself weekly, this one isn't going to do it for me. I'd have to edit the template and only add sufficient fields to fill the width. There's no obvious formatting option to correct this so it's pretty much useless. One of the most basic reports I could think of too. Get RVTOOLS here by the way, much better:
Now, about scheduling useful reports.....you can email them and save them to a network share, so that's something. I setup saving them to a share and you can choose weekly or monthly but that's it, no choice over the format either?! You can choose the start hour but not the minute, try testing your settings once per hour that way, see where I'm going?! No way to manually test the schedule either. Still think an Engineer designed  this?!! No idea if it works or what the format is - I gave up here.....!!

I did spot one nice thing when I was configuring the vCenter connection, that is to check compliance against the vSphere Hardening Guide. Brilliant! 
Define Monitoring Goals is one of the optional sections when setting up the vCenter connect - it defaults to No, even after you save it (!) but I am getting alerts for my Hosts and VMs against the hardening guide settings which is very useful. Thought I'd need configuration manager for that but at least it's a bonus here. 
So, that's one thing I'd definitely find useful beyond Host Profiles and the battle I have with them regularly! There's an associated report, great, let's run it!
The format is better at least but look at the number of pages - 236!!! Lol. So not that useful then. Like host profiles I'd be better off using scripts etc to do the hardening (unless you've bought vRealize Configuration Manager) and using this report to audit compliance........ 

There are good growth forecast reports which are useful, I'm not going to be running vRealize in my lab long enough to see the benefit but capacity planning is a strength and good to have. 

One other thing, when you run a report, once it finishes the screen refreshes so you've to scroll down AGAIN to find the damn thing unless you use a filter first. Annoying, simple for someone to fix but I doubt it ever will be.....

Here's a report on reclaimable space:
No percents listed, I've several templates but it's not clear if this means it didn't detect them or as they are thin provisioned there's nothing to reclaim off them. 

I love this report:


Very Graphic, clear and precise and tells us absolutely nothing....!

Now I think you can blame the user on this one, I'm sure after some additional knowledge & upskilling, training and time the product would deliver everything VMware raves about but a door is a door, put a handle on it and don't waste my time searching for things that should be obvious. Defaults should work for the most common use cases, like vCenter objects in reports. Maybe they intended to use this with a much wider palette than vCenter but if that's your core base, play to them first. This doesn't feel like a product designed by VMware to work with vCenter, doesn't that sound wierd to you? Like they wanted to connect this to all your physical servers too (there are agents for that) and suck in everything here. 

I finally decided to find the best view to put on a TV in an Ops room and this was it:
Not too bad. Given time it should provide more detail than my labs shows here and you can customize these (Advanced or Enterprise only) to your needs a bit more. There's a good blog post here on reports via this newer HTML 5 interface in 6.6:

I've not yet found a good resource about creating custom dashboards in 6.6 as all the articles are on the previous version and no longer valid. 

So, it's all down to if you're already bought into vROps via a licensing deal or do you have flexibility to look at other solutions. I'm very fond of Veeam One but whatever you choose / end up using you need to ensure it delivers sufficient quality information and no more, otherwise a spammed inbox isn't going to get any attention. 

Use the VMware Hands On Labs to look at this product or download a trial of the OVF like I did. I hope you find this useful and get the right solution for your Organisation. Best of Luck!